Showing posts with label Martha Stewart Punch. Show all posts

Monday, January 9, 2012

BE GOOD TO YOURSELF - Elegant Edges, Doodle Pantry, Martha Stewart

Hi Everyone - BE GOOD TO YOURSELF - that's my motto for this year.  I've decided that this is the year that I'm going to not only be good to everyone else, but I'm going to be good to ME also!!! 

I used the "Workout Birdie" from Doodle Pantry to make this card for MYSELF!!  TO ME FROM ME, WITH LOVE!!  I'm going to put this card on my desk at work since that's the place that I spend most of my time in the day.  I want it somewhere where it will serve as a daily reminder to BE GOOD TO YOURSELF. 
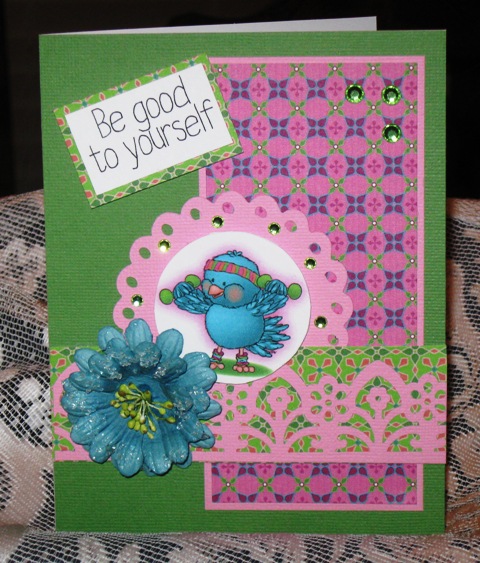


To make this card:
  • I covered the cardbase with green BAZZILL cardstock.
  • I printed the pattern papers from Doodle Pantry
  • I attached rectangles of pattern paper to the front of the card
  • I used the Martha Stewart Garden Gate punch to make the border which I adhered one of the rectangles.
  • Using Cricut Elegant Edges, I cut a 3" scalloped circle.
  • I printed the colored version of the Workout Birdie and trimmed it to a circle.
  • I glued a flower to the front of the card
  • The sentiment was printed from Doodle Pantry and popped on the front of the card.
As I said, this will sit on my desk in a prominent spot so that I'll see it all throughout the day and year.  I hope this card will inspire you to "be good to yourself" also!! 

Thanks for letting me and my mom take some time off from posting.  Mom is still recovering and will hopefully be back to posting sometime this week.  Thank you for your comments and your prayers.  We hope you'll come back again - until another day!  God Bless You, Donna

Challenges: 
Sisters - #73 Things with Wings  
Catch The Bug - 3E, SIO -  January Anything Goes   
Crafty Emma - E3 2W - #67 Anything goes  
Kraftin' Kimmie Stamps - SIO - #110 Time to shape up! (see challenge for details) 
Craft Us Crazy - 3E, 2W - Christmas, Anything New and/or Humorous 
Forever Friends - M, SIO, must include an animal - (January) A Shaped Card  
Throwback Thursday - 1E, must use Cricut - Sports (ends 18th Jan)  
Inky Impressions - 2W, SIO - #39 anything goes  
Paper Shelter Challenge - 3E, SIO - #45 anything goes  
Penny's Paper-Crafty - 2W - #70 birds 

    Wednesday, December 7, 2011

    Midnight Madness Sketch Challenge #134 - Snowed In Snowman

    This is my last post for Midnight Madness Sketch Challenge for 2011.  I have enjoyed my time on the Design Team.  I hope you like this project with Priscilla's fun image. 
     Card Recipe:
    5X6.5" Card Base
    Background Paper - Christmas paper from my stash
    Image - Priscillastyles' Snowed In Snowman
    Martha Stewart Snowflake Punch Around the Page Punch Set
    Stickles
    Promarkers - 
    Hat - Cool Grey 3 and Cool Grey 5
    Nose - Pumpkin
    Hands - Cocoa
    Scarf - Royal, Poppy
    Bird - Powder Blue, Cobalt Blue
    Snow and Snowman highlighted with cool gray 1 and stickles

    As always for Midnight Madness you have the choice of two different sketches.  Here are the sketches for MMSC#134.
     Clean and Simple
     Fancy
    Challenges for this card:
    ABC Christmas Challenge - Christmas - anything goes 
    Crafts and Me - #64 snow/snowflakes
    Creative Belli -  #132 winter/Christmas
    Divas by Design - #16 anything goes 
    Penny's Paper-Crafty - #68 Merry Christmas
    Craft Your Passion - Anything Goes PLUS Glitter
    Hooked on Crafts -  Winter Wonderland
    Make it Monday - always Anything Goes
    The Crazy Challenge -  Anything goes
    The Pink Elephant - Snowflakes and Sparkles
     Whoopsi Daisy  -   Snowflakes
    Thanks for coming by our blog.  We thoroughly enjoy your visits and comments.  God Bless You!!!  Peggy

    Thursday, November 17, 2011

    STANDING SANTA - CHRISTMAS CHEER, DIGITAL DELIGHTS BY LOUBY LOO

     IF YOU'RE LOOKING FOR THE FANTABULOUS HARVEST BLESSINGS CRICUT CRAWL CLICK HERE.

    Hey Everyone - I picked this Standing Santa digi to work with for my Digital Delights Digi project this week.  This digi comes porecolored so that makes it extremely easy to work with.

    I found a card base on Christmas Cheer that I used to cut out the cardbase at 7" x 5".  In the Cricut Craftroom, I merged a sleigh into the corner of the cardbase.  I then cut two strips of patterned paper.  I placed the Santa digi on a green square and popped him.  I used Word to print off the sentiment and glued on buttons. 

    I covered the inside of the card with patterned paper.  I used the Martha Stewart Snowflake Punch to create a border down the middle of the card.  I glued the negative from the front of the card sleigh to the inside. 

    
    This little Santa just makes me smile to look at him.  Please stop over at Digital Delights - Wendy is having a BIG sale.

    Challenges for this card.
    Digital Tuesday – Christmas Time
    Sassy Cheryl’s – Anything Goes
    Daisy Doodles Creating Challenge – Anything goes with a digi
    Make it Monday – Anythng Goes
    The Crazy Challenge – Recipe – 1 Image – 2 Paper, 3 Embellishments

    Please come back again tomorrow - we appreciate your visits and comments.  Until another day, God Bless You!!!  Donna

    Thursday, October 6, 2011

    SNOW DUMPLING - A CHILD'S YEAR, CUTTLEBUG, DIGITAL DELIGHTS

    Hi Everyone!  Wendy at Digital Delights by Louby Loo has new releases coming out today and I chose little "Snow Dumpling" to make a card with.  I must say that when I saw the digi that I just went, AWWWWW!!  He's the cutest!!


    To make this card, I used Cricut Craftroom and card feature on A Child's Year to cut the card base out of blue metallic paper.  The card originally had three snowflakes on the bottom but I only needed one snowflake.  I used the Hide Contour in CCR to hide two of the snowflakes.  I then cut the card at 12" x 6" and folded in half.


    I used the snowflake cuttlebug to emboss a white square of cardstock.  I used blue chalk on the embossed paper.  I colored "snow dumpling" with Promarkers.  I cut two strips of White Glitter Paper - one for the front of the card and one for the inside of the card.  I used Martha Stewart Snowflake Punch Around the Page punches to make snowflake borders with the glitter paper.  I punched the corners on top of the digi square and adhered blue bling.  I tied a bow using white wired ribbon.


    I then cut two snowflakes from A Child's Year and secured them to the front of the card with a snowflake brad. 

    This card will be entered in the following challenges: 
    Anything Goes Challenge - 2W- 1E - Diecuts/Punches or Both·        
    Paper Take Weekly - Anything Goes
    Partytime Tuesdays - 3E (2E anything goes wk) - PTT #36 Shaped Cards AND/OR Breast Cancer Awareness
    Sweet Stamps 1E, C10, SIO - Anything Goes
    Craft Your Passion - Anything Goes (plus Ribbons) 

    Crafty Cardmakers - 2W, C15 - (1st week) Anything Goes 
    Make it Monday - always Anything Goes
    Mojo Monday - Sketch* 

    I might just have to use this digi for my Christmas cards this year.  He's just too cute!! Please stop over at Digital Delights to view all the other digis and creations by the Design Team!!  You'll be glad you did!! Thanks so much for stopping by today - we appreciate you!!  Until another day, God Bless You!!  Donna

    Monday, July 25, 2011

    Heart Song Challenge - Mini-Tutorial

    At Heart Song Challenges today we were asked to include a mini-tutorial with our challenge card.  I chose Leah's "Jaspar" to make my card.  Rather than color him I printed him on pattern paper.  I did color his little heart nose.

    Card Recipe:
    A2 Card Base
    Background Paper - KandCo. - Classic K. Bailey Paper Stack
    Digital Image - Jaspar from Heart Song Designs Store
    Martha Stewart  - Lattice Punch Around The Page Punches
    Fanfold Paper Flower - Cut 12" strip from cardstock or pattern paper.  Determine how wide you want your flower to be and cut the strip of paper half that width, i.e., if you want your flower to be 3" cut strip 1 1/2 in. wide.  Use scoreboard to score 12" strip every 1/4".  Fanfold strip, Glue the ends together.  Gather up like a teepee, then push down to form flower.  Adhere to a  1 1/4 circle of paper.  Be sure to push center together as much as you can.  Decorate with an embellishment on top.

    I know most of you already know how to make this flower so thanks for allowing me to go on about it.  Thank you for stopping by today.  We love your visits and comments.  God Bless You!!!  Peggy 


    Wednesday, April 13, 2011

    Beautiful Baby Girl Gift Bag & Card - Wrap It Up

    Hi Everyone - do you remember the other day when I told you I found the Wrap It Up Cartridge covered up by a bunch of "stuff?"  Well, I'm really glad that I found it.  I used it this weekend to decorate a gift bag and card for a couple that I know that are going to have a bouncing, baby girl in June.  They are going to name her Anabella and call her "Bella!"  Don't you just love that name? 

    I used Design Studio and the Wrap It Up cartridge to decorate the bag and card.  Here are the recipes:

    Bag:

    Carriage - 6" - popped
    Sentiment Circle - freebie downloaded from Nettie's Cards

    Card:

    Use the card feature on the Wrap It Up cartridge to cut A2 Size
    Baby Carriage - 2" - popped
    Cut strip of pink cardstock and used Martha Stewart Heart Border Punch to create border
    Inside - Wrap It Up Cartridge - It's A Girl - 3" 
    I decorated the Envelope with the hearts and border punch that I had left over.

    I just love making something like this!!  Thanks for stopping by and please come back tomorrow!  Until another day - God Bless You!!  Donna

    Monday, March 14, 2011

    NettieG's Roses

    Today starts a new challenge on NettieG's Digital Gems.  It lasts for two weeks so you'll have plenty of time to create something with this beautiful image.  Nettie's challenge was to use colors we don't normally use or use together.  On my card I chose a black and white contrasting paper that I would not normally put with purple.  I don't think it takes away from the image. 

    Materials:
    5X6.5 Card Base
    Background Paper - KandCo. Black & Ivory Fusion
    Martha Stewart Corner Punch 
    Image - Roses from NettieG's Digital Gems Shop
    Ribbon
    Promarkers Used:
    Roses - Orchid, Amethyst
    Leaves and Stems - Leaf Green, Forest


    I hope you will play along with us for this challenge.  The image is pretty and fun to color.


    Thank you for looking today.  Your visits & comments keep us going.  God Bless You!!! Peggy

    Tuesday, March 1, 2011

    Sweet Dreams Baby Book - LOTS OF CRICUT

    You know there's nothing like a newborn baby to make you smile!  Jacob's teacher, Ms. Pennington, is expecting her first grandchild this week so I decided I would make her a brag book for some of her photos.  I don't know about you but I've never met a grandmother yet that didn't have plenty of pictures of their grandchildren to show you.


    For this project, I used LOTS of Cricut Cartridges.  I found a Rusty Pickle Chipboard Album that I bought at one of the CKC conventions that Mom and I attended.  I used the Basic Grey Oh Boy Collection to cover the chipboard with 6 x 6 1/2 pieces.


    Book Recipe

    COVER:Frame - I used Design Studio to make the frame using the George Cartridge.  I welded two squares together then welded stars inside the frame.
    Used Create A Critter to cut:
    Sheep - 2 1/2"
    Sweet Dreams - 1 1/2"
    Clouds - 1 1/2", 3/4"
    Stars - 1 1/4"
    Moon - 1 1/4"


    Popped the sheep and one of the clouds to add dimension.


    PAGES 2 AND 3

    Baby Blessings - cut at 1.5 x 3.8" with Wild Card and Design Studio
    Heart Border - Martha Stewart Heart Lace Punch
    Train - 1 3/4" - Create a Critter


    PAGES 4 AND 5

    Rocket - 6" (page), 4" (tag) - Just Because Cards Cartridge
    Wagon - 4 1/2" - Just Because Cards Cartridge


    PAGES 6 AND 7

    Bear - 2 1/2" - Doodlecharms
    Bottle Borders - 1" and 2" - Doodlecharms


    PAGES 8 and 9

    Giraffe - 4" - Create A Critter
    Lion - 2" - Create A Critter


    PAGES 10 AND 11

    Heaven Sent - 1 1/4" - Stamping
    Rattle - 1 1/4" Stamping

    I made pockets out of the mats where the pictures will be placed on several of the pages and inserted tags so that Ms. Pennington will have a place to make journal entries. 


    GIFT BAG

    Sheep - 6" - Create A Critter


    I really enjoyed making this book and I hope Jacob's teacher will like it. 

    Thanks for stopping by today and we hope that you've found some inspiration.  If you see something you like, please let us know.  Until another day, God Bless You!!  Donna

    Saturday, February 26, 2011

    Sugar Nellie's Joy

    I thought I would give Enfy's Promarker challenge just one last shot.  I found these beautiful digital stamps online.  I fell in love with them and just had to color one for this competition.  Promarkers make it so easy to blend colors.

    Card Recipe:
    5X6.5 Card Base
    Pink Gingham Paper by the Paper Studio
    Green Gingham Digital Paper
    Joy Digital Image by Sugar Nellie
    Frame cut out  - Lacy Labels Cricut Cartridge
    Heritage Cuttlebug Folder - emboss Frame
    Martha Stewart Punch - Daisy Dot Edge Punch
    Ribbon, Bling
    Promarkers Used:
    Face - Ivory, Satin, Blossom
    Lips - Sunkissed Pink
    Hair - Gold, Buttercup, Tulip Yellow
    Clothes - Meadow Green, Apple


    Thank you for taking a look at my card.  I hope you find some inspiration to try something new.  God Bless Each One!!!!  Peggy

    Wednesday, February 16, 2011

    Card Sets/Another Blog Award

    My hairdresser asked me to make her 25 Thank You cards.  She must have a lot of people to thank.  I decided to make them in sets. All the cards are A2 size.

     Supplies Used:
         DCWV  Mango Frost Paper Stack and Cardstock
         Labels cut from the Preserves Cricut Cartridge
         Martha Stewart Punches
         Ribbon
         Bling
         Small Flowers
         Thank You Stamp


    This set was made using:
         DCWV Black Currant Paper Stack
         Thank Yous, Shadows and borders cut from Paper Lace Cricut
               Cartridge
         Ribbon
         Bling
     This set was made using:
         DCWV Mariposa Paper Stack and Cardstock
         Labels cut from Stamping Cricut cartridge
         Butterflies from KayandCo. Wild Saffron Embellishments
         Ribbon
         Martha Stewart Punches

    This set can be used for a man as well.  I used the following:
         DCWV Denim Paper Stack
         Brads
         Corner punches 


    Now for another Blog Award.

    ScrapCrazyyyy  awarded us the Liebster Blog Award. Thank you, ScrapCrazyyyy.  I wish I knew her real name.  I don't like calling anyone crazy.  LOL

    The Liebster Award is given to people with talent you admire but you feel they do not get the recognition they deserve.  The requirements are to award it to 3 more bloggers.  Here they are (in no particular order). Please check out these talented ladies and follow their blogs.

     Larelyn at Handmade from My Heart
    Ruby at Ruby's Impressions
     Shelly at Shell's Space


    Thank you for stopping by for a visit today.  I hope you can find something you can use in your crafting.  God Bless You !! Peggy

    Tuesday, December 21, 2010

    Thanks Snow Much


    Hi Everyone!! - I've had an assembly line going making thank you cards for Christmas gifts I received from some of my volunteers. I covered the top of the card using a piece of star glitter paper that I bought at Michael's on clearance for 49 cents. Then I used a blue piece of shimmer paper for the bottom of the card that I embossed using the snowflake Cuttlebug embossing folder. I cut a strip of cream colored cardstock and used the Snowflake Martha Stewart punch to create the border.

    I printed the sentiment on light blue cardstock. I used two sizes of Nestabilities along with my Cuttlebug to cut out the sentiment circles. I layered them and then pop dotted them on the left side of the card. I purchased these Nestabilities at Hobby Lobby off the clearance aisle. I have wanted some of these for a long time and finally broke down and got some for myself. I must say "I'm glad I did!!"

    I hope you found some inspiration from this card - I made a lot of cards in a short amount of time by making all of them the same.

    Well, I'm excited to say that my Mom is coming to see us this week to hopefully stay for a long time!! Jacob is so excited - he keeps asking what day she's coming and then he'll ask - now what day is today?? That boy loves his Mamaw bunches!! This Christmas will be our first Christmas without my Dad and everyone in our family is missing him terribly. Daddy's favorite time of the year was Christmas - Jacob always said Papaw was a "Christmas Nut!" Daddy always had to have his Christmas decorations up first and my parents house was the prettiest house in the neighborhood!! Jacob asked me the other day - "Mommy, do you think that Papaw will be going to Jesus' birthday party in Heaven?" I told him that I was sure that Papaw would be there and would be having a great big piece of cake!! Oh, the innocence of a child!!

    I hope you all are enjoying your holiday season and I wish you a very Merry Christmas!! Thank you for visiting with us and allowing me to ramble on. We appreciate your visits and your comments. Until another day, God Bless You!! (P.S. Merry Christmas Eve, Eve, Eve) Donna

    Monday, December 20, 2010

    My Gift For You - Trim A Tree


    Good Morning, Everyone! I made this card to send to my Secret Santa couple along with the gift bags I decorated. I covered this card with Christmas paper. I used a Martha Stewart punch to make the border. I used the Trim A Tree cartridge to cut the package at 3". I printed the sentiment and pop dotted it on the card.

    Thanks for visiting and we hope you'll come back again soon. Have a good day and God Bless!! Donna

    Thursday, December 9, 2010

    Celebrate With Flourish And Color Challenge

    This little card was made to enter Color Challenge 12 at Crafters Digital Art Center (CDAC).  They have several challenges every month.  The sponsoring designer offers a free digital image for you to use in your creation.  This little owl was the image to be used with the colors brown, red and cream.  I love mixing digital images with Cricut cuts.
    After coloring the image, I cut two 12" strips of paper and edge punched them.  Determine what size you want your flower and cut your strips half that size.  I then created the pleated flower.  I used the owl as the embellishment on the flower.  The Merry Christmas was cut from Celebrate With Flourish.  I punched the brown background paper with the same punch as the flower and inked the edges of the red BG paper with brown. 

    Thank you for visiting our blog today.  I hope you will come back soon.  God Bless You!!!  Peggy

    Monday, December 6, 2010

    Red & White Card for 2 Challenges

    I had a very productive day crafting today.  I made several cards and entered several challenges.  Can you believe I said I made several cards?  It usually takes me 2 days to make one card.  It could have had something to do with me getting up at 4:30 am.  

    I made this card and entered it in 2 challenges, Doodle Pantry Blog and The Corrosive Challenge Blog.  Doodle Pantry's requirement is to use a Doodle Pantry digistamp.  The Corrosive Challenge Blog's challenge is to create a red and white Christmas card.  So I combined the two.  The presents on this card are from Santa's Accessories, one of the newer releases from DP.  There are several items in this set.  The sentiment is also Doodle Pantry.

    I used a MS Punch All Over The Page punch to make the 4 square tiles and lined them with red foil paper.  I think it meets all the qualifications of the challenges.

    Thanks for visiting today.  I hope to see you back tomorrow and for our blog hop Saturday.  God Bless You!!! Peggy

    Thursday, December 2, 2010

    Paper Lace Card Sets

    I was happy when Provocraft announced the Paper Lace cartridge.  I knew it was one I would have to have.  It arrived this past Monday.  I immediately started making cards.  I wanted to make a couple of card sets.  Paper Lace made it so easy.  I will show you some of the cards I made.  This post will be picture heavy but I want you to see what intricate cuts you can make.  Also, there are 6 ways to cut Thank You, You're invited, Happy Birthday, Congratulations, Just Because, Thinking of You, Get Well Soon, Celebrate, Best Wishes and I Love You.  Can you tell, this is my new favorite cartridge.  All these cards were made with DCWV Black Currant paper which I bought after seeing a card made by Nana Donna.

    I used Martha Stewart Doily Lace Deep Edge Punch to punch the borders for this card.  The celebrate is from the Elegant Cakes cartridge.  I added some Flora Doodles and stickles for bling.
    Card 2 - I used Happy Birthday, Page 53, Lace 2 and Lace 2 Shadow in the Paper Lace handbook.  The lace is some I got at Hobby Lobby and I added Flora Doodles flowers.
    Card 3 - I cut a 3.25 X 5 piece of paper and punched around it with MS Deco Fan punch around the page punches.  The base paper is an embossed black.  The Thinking of You is the base feature on page 56 of the handbook.  I did not use the base shadow because the punched piece emphasized the cut. 
    Card 4 - I used Page 57, Lace 1 for the Get Well Soon.  The background is Page 30, Lace 2.  These shapes are shown square but I changed it to fit an A2 card (4.25X5.5").  It looks a little different than the handbook but still has a nice pattern.  The flower and the scroll are from Elegant Cakes.  I cut various sizes for the flower, then curled the edges up and added a gemstone.

    Card 5- The Thank You on this card is Page 51, Lace 1.  I layered it over Gray background paper and wove the black lace throught it.  Then added pink gemstones.
    Card 6- The borders on this card were cut from Page 42, Lace 1.  I stretched it to fit the 5.5 width of my card.  The celebrate was cut from Page 68, Lace 1. 
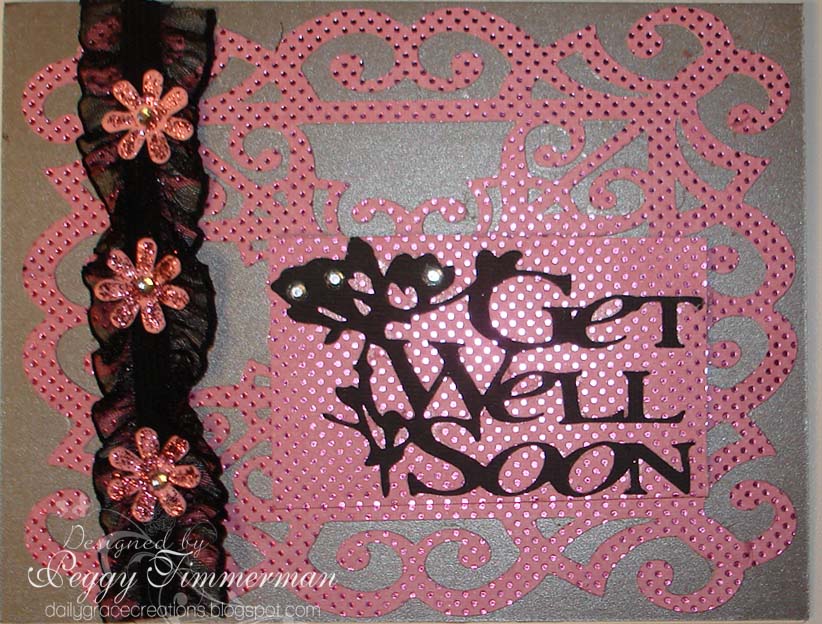
    Card 7- The background of this card is Page 30, Lace 1 feature.  Again I stretched it to fit an A2 card.  I layered the Get Well Soon, Page 57, Lace 2 over a piece of the pink paper because it seemed to get lost on lacy background.
    Card 8-  The Happy Birthday on this card is on Page 53, Lace 1 and Lace 1 Shadow.  The flourish under it is on Page 33, Lace1.  Ribbon again is Hobby Lobby.

    I won't post the rest of the cards since they're similar to these.  I hope I haven't bored you too much but you can see what a great selection of cuts are in this cartridge.  Thanks for visiting our blog.  Hope to see you again real soon.  God Bless You!!!  Peggy


    Wednesday, November 17, 2010

    A Reverse Color Card

    I don't if that's the right terminology for this card.  I downloaded a coloring page from the internet.  I had read a tutorial on how to change the outline color of a digital image.  So I thought I would give it a try.  I was working on it in Photoshop Elements. My version is an old one but it does a lot more than I know how to do.  Any way, while I was working on it, I managed to reverse the colors.  The background became green instead of the outline.  I could have changed it but liked the way it looked.  I printed it out and decided to try one of the Promarker techniques Enfys Cashmore from Going Buggy had on her blog last week.  It was how to color white images with Promarkers.  You use very little color.  I tried it on the white flowers.
    I made this card for my sister to give to someone who is ill.  I didn't have a cartridge that had Get Well Soon on it so I used the Thinking of You phrase on the Stamping cartridge.  I also cut the message frame from Stamping.  The background paper is Anna Griffin's Carolina Collection.  I used Martha Stewart's Scroll Lace punch to decorate the edges of the papers.  I hope this card will cheer this lady.

    Thank you for visiting our blog today.  God Bless You!!  Peggy

    Tuesday, November 16, 2010

    Wishing You This Kind of Happy - Doodle Pantry Digi

    Hello Everyone - it's been a while since I've posted anything on the blog. I was afraid my mom would fire me for being a bad blog partner. I've just been terribly busy lately with no time to sit in my "Happy Space!" Thankfully, I have a wonderful blog partner who carried on wonderfully without any help from me!! My partner's not just a wonderful mom, but she is VERY talented!!


    I made this card for a friend of mine that will be having a birthday soon. I downloaded this digi stamp from Doodle Pantry Digi Stamps (love them) and colored it with the help of my Mom. She's a good tutor!! I cut the blue cardstock at 6" x 12" and scored it at 3" and 9" and folded it to make a gate fold card. I used a Martha Stewart Punch (I really think that Martha should give me a discount as many of these punches that I've purchased.) I used the Lacy Labels cartridge to cut the frames. I used the Flower 7 option on this cartridge.

    I think this little birdie is about the cutest little bird that I've seen and he makes me smile every time I look at him!! Well, I hope you found some inspiration today and that you'll come back to visit soon!! Invite your friends to come play with us too!! Until another day, God Bless!! Donna

    Friday, November 5, 2010

    I Am Chosen To Be Guest Designer at Doodle Pantry for November

    I received an email from Laurie Wilson at Doodle Pantry DigiStamps saying I had been chosen to be guest designer for November.  I feel so honored.  I'm a big fan of Laurie's digital stamps.  On November 6 a new challenge will start on Laurie's blog.  All you have to do is use a Doodle Pantry image for the challenge.  You will get the featured image for free AND be entered to win the big prize.  So please play along with us.  If you've been wanting to try digital stamps, this is your opportunity.

    For my first post in November, I chose Laurie's Ibis Bird.  I looked up Ibis Birds on the internet and found they come in several different color pallettes.  When I first looked at the image I got from Doodle Pantry, in my mind I saw a white bird and there are some that are mostly white.  But I found there is a Scarlet Ibis so I chose this one to color.
    My card is 5"X5".  I colored the image using Promarkers.  I hope one day to make a video showing how I use them.  I cut the image and punched around it with a new Martha Stewart Punch called Cherish.  I love how it looks like paper piercing.  The sentiment is also part of the digital image.  Laurie has a tutorial on her blog showing how to combine two images in MS Word. I saw this after I had completed my card.  I could have combined the two and not covered up part of my image.  However, I popped the greeting for dimension.  I love the way it turned out.  I hope we can inspire you to try digital stamping.  It has become a favorite of mine and Donna's.

    Thanks for visiting our blog.  Please tell your friends about us.  Don't forget Laurie's challenge tomorrow.  God Bless You!!! Peggy

    Friday, October 22, 2010

    Another Wedding Card

    I posted a card last week I made for the wedding couple but I did not like it.  I just can't give a card I'm not happy with.  So Sunday afternoon, I pulled out my green and brown (Stephanie and Christopher's colors) papers again.
    This is the card I created for them.  I like it a lot better.  The background paper is My Mind's Eye Fall In Love paper stack.  The brown doily is cut at 4.25 inches using the Storybook cartridge.  The pleated flower is made from the background paper. I attached it to the doily and glued a Prima flower to the top of the pleated flower.  I attached ruffled lace behind the doily.  The "Mr & Mrs" was cut at 1" using the Tie The Knot cartridge.

    The message section was created by layering more of the background paper and cream colored cardstock.  The "Just Married" from Tie The Knot was cut at 1 1/2". 

    Thank you for visiting.  We love your comments and suggestions.  If there's anything you would like to see us try, please let us know.

    Monday, October 18, 2010

    Bereavement Card

    I'm like the rest of you.  I don't like to make cards of condolence.  However, we all end up making them at some time or another.  One of my late husband's cousins passed away Friday night after a hard battle with pancreatic cancer.  He and my "Gentle Ben"  had the same surgery in 2008.  We will miss you, Michael.
    I chose this digistamp from Fred She Said and colored it with Promarkers.  The little butterflies are made using a Martha Stewart Stamp and Punch Stamp Set.  The background paper is DCWV Rustic Paper Stack. 
    I cut the inside papers from the same paper stack and punched with a MS corner punch.  The butterflies and little flowers were made with an EK Success punch called Butterfly Chain. 

    Thank you for visiting our blog today.  Please keep Michael's family in your prayers.  I know how much they need it.  God Bless You.  Peggy
    Cricut Top 40