Showing posts with label Design Studio. Show all posts

Saturday, November 5, 2011

12 DAYS OF CHRISTMAS - DAY #5 - SOPHIE, ELEGANT EDGES, DESIGN STUDIO

Hi Everyone - It's day number five in the 12 Days of Christmas at Digital Delights at Louby Loo.  I must say that I just LOOOOVVVEEEE  this digi!!  To make this card, I did the following:


I cut the cardbase from the Sophie Cartridge at 7" using the snowflake card out of red cardstock. 

Using Elegant Edges, I cut the white scalloped doily shadow at 4.5" x 4" - then the red snowflake paper doily at  4.25" x 3.724".  I cut the green scalloped doily shadow at 3 3/4" x 3.119 and the green holly paper doily at 4" x 3.5".  I adhered them together to the cardbase.  I tied a red bow around the green square. 

I colored the Five Golden Rings digi with Promarkers and popped on red dotted paper. 


I then cut the border on the inside of the card using Elegant Edges.  

Please visit Wendy over at Digital Delights and see all the digis she has created for the 12 Days of Christmas.  I'm going to enter this card in a contest at a Circle Cricut Crop I'm going to today!!  Hope I win!!  Until another day, God Bless You!!   Donna

Thursday, September 22, 2011

BEE HIVE LARRY - GEORGE, ACCENTS ESSENTIAL, DIGITAL DELIGHTS

Hi Everyone - I must say that I love this little bee - I think he's a cutey!!  You can find Bee Hive Larry over at Digital Delights by Louby Loo along with a lot of other great digital stamps.  I wanted to make a card with Larry because when I bought my first Cricut machine several years ago, I downloaded a file to be used in Design Studio that will cut a honeycomb pattern in the card.  I had always liked the file but had never used it.  Kinda like alot of the "stuff" I have in my Happy Space.  But I digress!

I cut this card using my Cricut Expression.  The cut file uses George and Accent Essentials to cut the cardbase.  I colored two of Larry and his honeycomb using Promarkers, then cut them out and pop dotted them for dimension.  I added a bumble bee brad above the honeycomb.  Very simple but still very cute!!

I think I'm going to make him into a Thank You card for a friend of mine.  Maybe I'll put the sentiment of "Just Beeeecuz" on the outside and on the inside "You're as sweet as honey!"  Too cuuutttee!!!

I've had the cut file for several years and do not remember who made the cut file and who I downloaded it from.  So if it's yours, thanks so much!!  If you would like the cut file, please leave me a comment and I'll send it to you!  

Challenges I will enter this card in:
Crafting For All Seasons -  Fall Colors
Scrapbook Sisters - Autumn Colors
Anything Goes Challenge Blog - Anything Goes


Thanks for stopping by and taking a look!  Please come back tomorrow and bring some friends with you!  Until another day, God Bless You!!  Donna

Sunday, September 18, 2011

Just Running By - Sports Mania

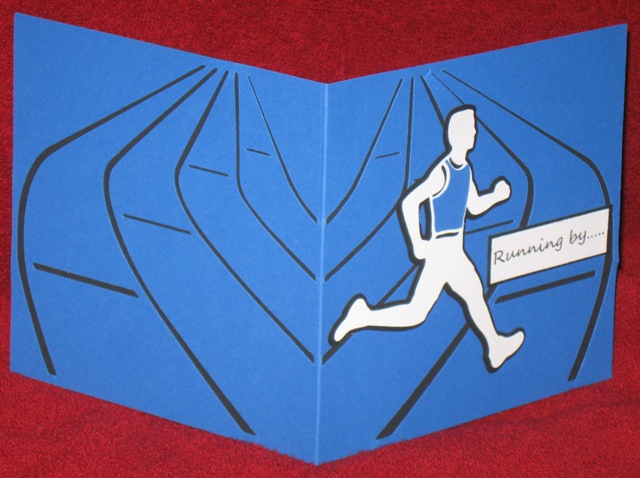
Hi Everyone - One of my best friend's sons is having a birthday on Monday.  He's turning 15!  He has always been such a good friend to Jacob.  He has grown into such an intelligent, respectful young man.  He runs cross country track so I used the Sports Mania cartridge and Design Studio to make him this card in his school colors. 

In Design Studio, I merged two tracks together (flipping one image) to form the card to measure 5 x 10.  I then cut out a male runner and adhered it to the front.  I cut out the border of three runners and put them inside the card.  I used Word to generate the sentiment.   

Front:

Inside:


Front and Back of Card:

Thank you for stopping by today - we appreciate your visits and your comments.  Until another day - God Bless You!! Donna

Thursday, September 8, 2011

Haystacks the Scarecrow - Pumpkin Card using Damask Decor

Hi Everyone - today for my DT post for Digital Delights at Louby Loo, I decided to make a Fall/Thanksgiving Card. I used"Haystacks the Scarecrow" and the "Pumpkin Set". I must say that I just love this scarecrow. He was so much fun to color.


I wanted to make a card that was near the shape of the pumpkins in the digi stamp from Digital Delights. I used www.mycutsearch.com to find a pumpkin on the Damask Decor cartridge.

In Design Studio, I merged two pumpkins together to form the cardbase. I also decided that I would decorate the inside of the card, so I put two smaller pumpkins on the mat to be cut at the same time. I put yellow cardstock on the top of the mat to be the card and then red cardstock on the bottom of the mat for the inside of the card. A picture of my file in Design Studio is below.


I colored Haystacks and the Pumpkin Set using Promarkers. I then cut each digi out. I adhered the pumpkin set to the front of the card and used pop dots on Haystacks to add more dimension to the card.

In Word, I merged the digital sentiment "Ever Thankful" from the Fall Sentiments set with the Pumpkin Set. I printed it on white cardstock and then used a 1 1/2 inch circle punch to cut it out. I then pop dotted it on the front of the card.

All in all, I think Mr. Haystacks turned out pretty cute!! He makes me think of Thanksgiving and my Mom's famous (within our family) dressing!! Thanksgiving wouldn't be Thanksgiving without my mom's dressing. Usually around the first of November, when I call my mom (several times a day), I'll ask at least once - "Do I smell dressing cooking?" For those of you that don't know, my mom is a VERY GOOD cook!!

Well, thanks for letting me ramble on. Thanks for your visits and I hope you also take a visit over to Digital Delights to find all the digis used in this card. Wendy has many wonderful digital stamps for every occasion. Also, check out all the other Design Team's creations. Thanks for your visits and your comments - we do appreciate them!! Until another day, God bless you!! Donna

Friday, August 26, 2011

Just Fluttering By - Butterfly Card using Florals Embellished


Hi Everyone! I bought the Florals Embellished cartridge a few months ago because I just "had" to have it. Well, last week when Mom and I were trying to get me organized, I found it - HAAAAA!! So I thought I would make something with it.


I used Design Studio to weld together two of the Butrfly2s on Page 64 of the Florals Embellished book. This formed the card base cut at 7" x 5". I then cut the Btfly2-s, Layer 1, and Layer 2 to decorate the card base. I think it turned out rather pretty!!


Now I remember why I wanted this cartridge so bad. If you don't have it yet, it's worth purchasing. Thanks for stopping by today - we appreciate your visits and your comments. Until another day, God Bless You! Donna

Tuesday, August 9, 2011

BACK TO SCHOOL NOTECARDS/PURSE - MY COMMUNITY, CELEBRATE WITH FLOURISH

Hi Everyone!  School will be starting back soon so I thought I would make something for Ms. Pennington who was Jacob's teacher last year.  Just a little something to welcome her back to the new school year.  I tried to find out today what class Jacob will be in next year so that I could make his new teacher a little welcome gift too, but no luck.  They keep those lists locked up like Fort Knox until Open House the week before school starts. 

I found the instructions for a card purse on Splitcoaststampers.  The directions were very easy to follow.  Here is the link to the website

I've ALWAYS loved the smell of a new box of Crayons.  We were shopping for school supplies this weekend and Jacob caught me sniffing a "new" box of Crayons.  He said, "Mom, what are you doing?"  So I explained my love of the smell.  YES, he did think I was crazy but I digress.  So it was with that thought of crayons that I decided to make the notecards/purse below:

Using Design Studio, I welded the square and tall rectangle from George and the Crayons from My Community together to form the notecard.  The picture below is the screen shot of the cut file in Design Studio.  I have this cut file saved and would be willing to share with you - all you have to do is ask.  I cut the notecards out of primary color cardstock - red, orange, and yellow.

I cut the layers for the crayons out of pattern paper to match the front of the notecard box.  This is included in the cutfile along with the words "Back To School" from the Celebrate From Flourish cartridge.  

I think they turned out cute and the only thing missing from them is the "crayon smell."  Love it!!

Well, thanks for stopping by and we hope you'll come back again!  Like I said, if you would like the cut file, please let me know and I'll send it to you.  I think I'll go color something!  Until another day, God Bless You!!  Donna

Friday, June 17, 2011

HAPPY FATHER'S DAY, CRAIG!!!

Hi Everyone!  I haven't posted in a while!  This month is one the busiest months at my job so I've been swamped with work both night and day! 

I figured that I better make a Father's Day card for my husband since Father's Day is this Sunday.  I must confess that I wasn't in the mood to make this type card because I've been really missing my Daddy!  He's been gone a little over a year now and I have many wonderful memories of what a great dad he was!!  It helps to know that I will see him again one day!!
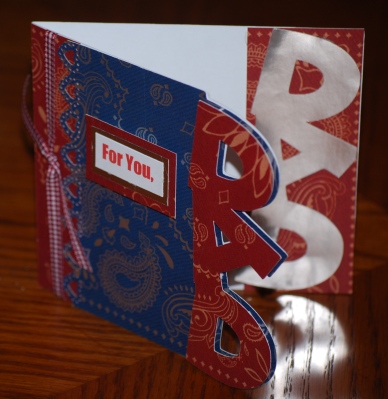
I designed this card in Design Studio using Plantin and Mickey Font.  I welded the rectangle and the letters to form the card base.  I then cut the top of the card out of the blue paper in the DCWV Bluejean Paper.  I then cut the letters out of red and silver paper.  I used the Martha Stewart Heart Punch to punch the heart border down the side.  I pop dotted the red "Dad" on the front of the card and adhered the silver "Dad" to the inside.  I then used Word for the sentiment and then framed it with silver and red paper.

Don't forget to honor your Dad on Father's Day and make sure you tell him how special he is to you and treasure every moment.  Thanks for stopping by and we hope you'll come back again another day!  Until another day, God Bless You!!  Donna

Monday, April 18, 2011

Birthday Cards - Bugaboo Digital Stamp

Hi Everyone!!  I just spent the weekend with my little mama!  She came for a visit and we had a good time just doing nothing!!  That's why we didn't have any blog entries this weekend - we just enjoyed each other's company. 

I made these two cards last week to be entered into four challenges each but I was so busy that I didn't have time to enter them.  Oh well, maybe next time. 

I made these birthday cards using a digi from Bugaboo Digital Stamps for two of the volunteers that work in my office. 

I colored both digis using the following Promarkers:

Leaves - Pear Green, Pine, Forest Green
Bugs - Poppy, Red, Cool Grey 5
Flowers - Gold, Sunflower, Tulip Yellow, Yellow, Pumpkin, Orange, Cool Grey 2 & 3


For this card, I used Design Studio to weld together two scalloped circles at 5.75" from the Lacy Labels cartridge.  I cut the second circle at 4.85 and the scalloped frame at 4.75.  Sentiment is Word generated.

For the second card, I cut two scalloped circles from the Lacy Labels cartridge at 3" and 2".  I used the swirl cuttlebug embossing folder on one of the circles. 


My volunteers loved their cards.  They're such sweet people!!  Thanks for visiting with us today and we hope you'll come back again tomorrow.  Have a great Monday and until another day, God Bless You!!  Donna

Monday, April 4, 2011

4th Grade Classroom Door - Spring

Hi Everyone - Using Design Studio and my Expression, I cut the decorations for Jacob's teacher's door for Spring.  You know that the schools are not allowed to mention anything about God so I wanted to come up with a saying that might possibly bring the Easter Holiday to mind!  To come up with the saying, I first thought about the Easter Holiday and the Resurrection of Christ and then I thought about how the flowers start blooming, the trees start budding, and all the animals are coming out from a long winter's nap!! I decided to use the saying,

"Spring brings new life to the world!"

Door Recipe:

Spring - Stretch Your Imagination
Other Words - welded using Design Studio and Cursive 101
Archway, Picket Fence, Flowers - Bloom
Border - Plantin, WIMG
Squirrels - can't remember

I think it turned out pretty!  Thanks for coming by and visiting - we hope you'll come back tomorrow!  If you see something you like, please let us know.  Until another day, God Bless You!  Donna

Tuesday, March 1, 2011

Sweet Dreams Baby Book - LOTS OF CRICUT

You know there's nothing like a newborn baby to make you smile!  Jacob's teacher, Ms. Pennington, is expecting her first grandchild this week so I decided I would make her a brag book for some of her photos.  I don't know about you but I've never met a grandmother yet that didn't have plenty of pictures of their grandchildren to show you.


For this project, I used LOTS of Cricut Cartridges.  I found a Rusty Pickle Chipboard Album that I bought at one of the CKC conventions that Mom and I attended.  I used the Basic Grey Oh Boy Collection to cover the chipboard with 6 x 6 1/2 pieces.


Book Recipe

COVER:Frame - I used Design Studio to make the frame using the George Cartridge.  I welded two squares together then welded stars inside the frame.
Used Create A Critter to cut:
Sheep - 2 1/2"
Sweet Dreams - 1 1/2"
Clouds - 1 1/2", 3/4"
Stars - 1 1/4"
Moon - 1 1/4"


Popped the sheep and one of the clouds to add dimension.


PAGES 2 AND 3

Baby Blessings - cut at 1.5 x 3.8" with Wild Card and Design Studio
Heart Border - Martha Stewart Heart Lace Punch
Train - 1 3/4" - Create a Critter


PAGES 4 AND 5

Rocket - 6" (page), 4" (tag) - Just Because Cards Cartridge
Wagon - 4 1/2" - Just Because Cards Cartridge


PAGES 6 AND 7

Bear - 2 1/2" - Doodlecharms
Bottle Borders - 1" and 2" - Doodlecharms


PAGES 8 and 9

Giraffe - 4" - Create A Critter
Lion - 2" - Create A Critter


PAGES 10 AND 11

Heaven Sent - 1 1/4" - Stamping
Rattle - 1 1/4" Stamping

I made pockets out of the mats where the pictures will be placed on several of the pages and inserted tags so that Ms. Pennington will have a place to make journal entries. 


GIFT BAG

Sheep - 6" - Create A Critter


I really enjoyed making this book and I hope Jacob's teacher will like it. 

Thanks for stopping by today and we hope that you've found some inspiration.  If you see something you like, please let us know.  Until another day, God Bless You!!  Donna
Sunday, February 20, 2011

LUCKY EWE!!

Hi Everyone - I decided I would try something new when I received this new digi from Laurie at Doodle Pantry Digi Stamps.  I decided that I would make something that would hold candy. 

I used Design Studio and the cartridges George and Create A Critter to cut the horseshoe shape  at 6 x 7.  I then cut 2 strips of blue paper, scored it at 3/4 inch on both sides.  I then glue the strip of blue paper between the two horseshoe forms.

I then cut the horseshoe out again using the Digi Paper designed by Laurie Wilson at Doodle Pantry and adhered it to the front of the candy holder.  I then colored the sheep sitting on a horseshoe with the following Promarkers:

Horseshoe:  Sunflower, Gold
Sheep:  Blush, Satin, Pale Pink, Cool Grey 2, Cool Grey 3

I then popped the digi.  The sentiment is a digi stamp from Doodle Pantry.  

Thanks for visiting and we hope you send your friends our way!  Have a good Sunday.  Make sure you visit the Doodle Pantry website - you'll be glad you did!!  Until another day,  God Bless You!  Donna 

Friday, February 18, 2011

BEST OF LUCK - Doodle Pantry Digi Stamp

Hi Everyone - HAPPY FRIDAY!!  I made this card using one of the new digi stamps drawn by Laurie Wilson over at www.doodlepantry.com.  I'm a guest designer for Doodle Pantry this month and I must say that I've totally enjoyed myself.  I love all of Laurie's images so please go take a look around her store.  I guarantee you will find something that you can't live without!

For my card, I used Cricut Design Studio and using the Designer's Calendar cartridge, I welded two clover images together in order to make it into a card.  I cut the card at 6 1/2 x 5 1/2.  I then cut two smaller clovers in patterned paper.  I colored the digi using the following Promarkers:

Clover - Pine, Forest Green, Pear Green
Ant - Walnut, Cocoa

I popped the digi to make it show up more dimensional.  The sentiment "Best of Luck" is also from Doodle Pantry. 

Thank you for visiting our blog and we hope you'll come again tomorrow.  We love visitors and we love comments.  Have a good day, a good weekend, and a Happy President's Day!  Until another day, God Bless You!!  Donna

Saturday, February 5, 2011

I've Been Chosen As A Doodle Pantry Guest Designer for February

I received an email from Laurie Wilson at Doodle Pantry DigiStamps saying I had been chosen to be guest designer for February. Jacob thought there was something wrong with me because I started squealing as I was reading the email.  Needless to say, I feel so honored to have this opportunity. I'm a huge fan of Laurie's digital stamps and have made many cards using her designs. On February 5, a new challenge will start on Laurie's blog.  If you've been wanting to try digital stamps, this is your opportunity and Laurie's blog is a very good place to start.

For my first post in February, I chose Laurie's Clover Patch Ants. I thought the little ants were so cute and I loved the saying about friends because true friends are hard to find. 

My card is 7"X 6.5" using Provocraft Design Studio to cut the card base with my Cricut Expression and the cartridge, A Child's Year. I colored Laurie's image using Promarkers:


Ants - Cocoa, Tan, Red
Clover and Grass - Pine, Forest Green, Leaf Green


Thanks for visiting our blog. Please tell your friends about us. Now go over to Laurie's blog and become a member and enter her challenge. Until another day, God Bless You!!! Donna

Friday, January 14, 2011

Basketball Card for Braden - Sports Mania

I have a wonderful friend, Sherry, who has a son who's birthday is TODAY which is two days before Jacob's birthday.  Braden and Jacob are 3 years and 2 days apart in age.  Sherry and I were stay at home moms together for a while and our boys have always been big buddies.  Braden is involved in every sport imaginable and right now, he is playing basketball.  Thus, I made him a basketball card!!

I used the basketball on the Sports Mania cartridge and Design Studio to weld the basketball shape into a card which I folded in half.  I then ran the top layer through the Cuttlebug to add the texture of the basketball.  I pop dotted the sentiments that were printed off using Word.

I hope Braden will like it!!  He's such a sweet, mannerly young man!!  Happy Birthday, Braden!!

Thanks for visiting!! Until another day, God Bless You!!  Donna

Friday, October 29, 2010

Whooooo Wants Some Candy - Lacy Labels


Happy Halloween Eve, Eve Everyone!! A friend of mine gave me a little Halloween treat this week and I asked her permission to scraplift it!! So I have to give Sonia Moss all the credit for this creation. I scraplifted this so that Jacob could give it to his teacher for Halloween.
I used the Lacy Labels and Design Studio to make this.

I cut the base of the owl by using the "All Girl" frame at 4 1/2 x 3 1/2. I cut the scalloped circle with the "Scallop3" image on this cartridge at 1 3/4" . I cut the cream circle at 1 1/4" and the green circle at 1" using the "Home" image. I used a 1/2" punch to cut out the brown circle for the center of the eyes. I cut another orange scalloped circle at 1" to use for the mouth. For the nose, I cut a triangle out of an orange circle. I then used the Flourish Cuttlebug Embossing Folder to add texture to the body of the owl. I then put candy in a clear cello bag and stapled it closed. I used Tacky Tape to attached the owl body to the bag.


I hope his teacher will like it. Speaking of candy, please keep checking back to our blog because we are going to be giving away some "blog candy" in the VERY near future. Thanks for visiting and we hope you'll come back!! Until another day, God Bless!! Donna


I

Sunday, October 10, 2010

For You - Nana Vic's Digitals/Cricut


Do you remember that I told you that my mom was teaching me to color my digi stamps? Well, I downloaded the digi stamp on this card from Nana Vic's Digitals for free. Nana Vic has lots a beautiful digi stamps that she created herself. I decided I would enter a Sketch Challenge over at Taylored Expressions using this digi.

I used Design Studio to cut the scalloped green background paper. I used the square on Plantin and the Scalloped Rectangle on Lacey Labels and welded them together so that only one edge of the rectangle was scalloped. I colored the digi stamp using Marvy Markers (wish they were Promarkers but have to use what I have). I think my coloring has improved since Mom came to visit. She's a great teacher and Mom!!


Thank you for stopping by for a visit and we hope you'll come back soon!! Until another day, God Bless You! Donna


Sunday, September 26, 2010

Sweethearts & Cindy Loo - Happy Day

Hi Everyone!! I don't know if you'll remember the invitations that Mom and I made for my friend's niece but I went to a shower for Taylor tonight. The card below was made for her.

I covered the cardbase with pink glitter paper and then used the Cindy Loo Cartridge to cut the background paper out of the SEI White Elegance cardstack. Then I used the Sweethearts Cartridge to cut out the dress and the tuxedo at 4" for the front. I used a $1 Studio G stamp for the sentiment.

I'm happy to say Taylor liked the card. Well, Jacob asked that I tell you all HI! He said that he's always wanted his name to be on the internet so this should make him happy. Thanks for coming to visit and I hope you have a good weekend. Until another day, God Bless!! Donna

Tuesday, September 21, 2010

SWEET TREATS BIRTHDAY CAKE!

Hi Everyone!! I thought I would try something with my Sweet Treats Cartridge - a cartridge that I've had for longer than I want to admit and haven't done anything with it. I used Design Studio to weld the birthday cake and the cake plate together to measure 5" x 7". I cut the card base out of white cardstock. I then cut the cake plate out of green cardstock. I cut the cake again from patterned paper.
I used the Martha Stewart Gooey Goo Paper Punch to punch the pink patterned drippy icing. I used hot pink flowers from the $1 section at Micheal's to top off the cake.


I hope you like and I hope you'll come visit again soon. If you would like the cut file, please pm me and I'll send it to you. Until another day!! Donna
Cricut Top 40