This card was created for today's challenge at Nettie G's Digital Gems. Nettie created this stamp for JenLee, a digital artist who just happens to make belly dancer costumes also (along with any number of other crafts). She lives in Durban, South Africa. The Quilted Heart is Nettie's design. I added 2 more stamps from Clear Dollar Stamps to my card.
Card Recipe:
5X6.5" card base
Background paper to coordinate with the colors you use on your digital images.
Rick Rack or Ribbon
Computer generated sentiment. You could use a stamp if you so desire.
Promarkers used:
Heart -
Squares w/Flowers - Almond, Canary, Cerise
Squares w/Stripes - Pale Pink, Maroon
Squares w/dots - Blush, Fuschia
Squares w/x's - Pink Carnation
Bow - Fuschia
Hearts - Fuschia
Ruffle - Almond, Putty
Spools - Putty, Sunkissed Pink, Pink Carnation, Fuschia, Rose Pink
Pin Cushion - Lipstick Red, Berry Red, Emerald
Pins - Silver & Gold Metallic Gel Pens, Lipstick Red, Canary, French Navy, Emerald
Thank you so much for stopping by. We love having you. God Bless You!!!! Peggy
Showing posts with label Non Cricut. Show all posts
Monday, January 31, 2011
Friday, January 7, 2011
Birthday Greetings
Have you ever had one of those days when you would forget your head if it wasn't attached? Yesterday was one of those days. I seem to have more of those days than I care to have lately. LOL That is why my post is late. I apologize. Not only was it late but I forgot to put the picture in it. LOL
This little turtle is bringing "Birthday Greetings" to a very special young man in my life. Jacob is coming next week to celebrate his birthday with me. We will have a grand time.
This little turtle came from Whimsy and Stars Studio. I've entered him in another challenge on CDAC. This card was very simple to make. After I colored him, I found paper that matched perfectly with those colors. I covered a 5X6.5 card with that paper (sorry I don't know what stack it's from) popped my little turtle, added buttons and the sentiment. Promarkers used to color him:
Cupcake - Tan, Cocoa, Vanilla
Wrapper - Vanilla, Saffon
Candle - Aegean, Amber, Yello
Turtle - Marsh Green, Moss Green, Khaki
Hat - Red, Satin
Thanks for stopping by today. We hope you have a wonderful weekend. God Bless You!!! Peggy
This little turtle is bringing "Birthday Greetings" to a very special young man in my life. Jacob is coming next week to celebrate his birthday with me. We will have a grand time.
This little turtle came from Whimsy and Stars Studio. I've entered him in another challenge on CDAC. This card was very simple to make. After I colored him, I found paper that matched perfectly with those colors. I covered a 5X6.5 card with that paper (sorry I don't know what stack it's from) popped my little turtle, added buttons and the sentiment. Promarkers used to color him:
Cupcake - Tan, Cocoa, Vanilla
Wrapper - Vanilla, Saffon
Candle - Aegean, Amber, Yello
Turtle - Marsh Green, Moss Green, Khaki
Hat - Red, Satin
Thanks for stopping by today. We hope you have a wonderful weekend. God Bless You!!! Peggy
Monday, October 18, 2010
Bereavement Card
I'm like the rest of you. I don't like to make cards of condolence. However, we all end up making them at some time or another. One of my late husband's cousins passed away Friday night after a hard battle with pancreatic cancer. He and my "Gentle Ben" had the same surgery in 2008. We will miss you, Michael.
I chose this digistamp from Fred She Said and colored it with Promarkers. The little butterflies are made using a Martha Stewart Stamp and Punch Stamp Set. The background paper is DCWV Rustic Paper Stack.
I cut the inside papers from the same paper stack and punched with a MS corner punch. The butterflies and little flowers were made with an EK Success punch called Butterfly Chain.
Thank you for visiting our blog today. Please keep Michael's family in your prayers. I know how much they need it. God Bless You. Peggy
I chose this digistamp from Fred She Said and colored it with Promarkers. The little butterflies are made using a Martha Stewart Stamp and Punch Stamp Set. The background paper is DCWV Rustic Paper Stack.
I cut the inside papers from the same paper stack and punched with a MS corner punch. The butterflies and little flowers were made with an EK Success punch called Butterfly Chain.
Thank you for visiting our blog today. Please keep Michael's family in your prayers. I know how much they need it. God Bless You. Peggy
Monday, September 13, 2010
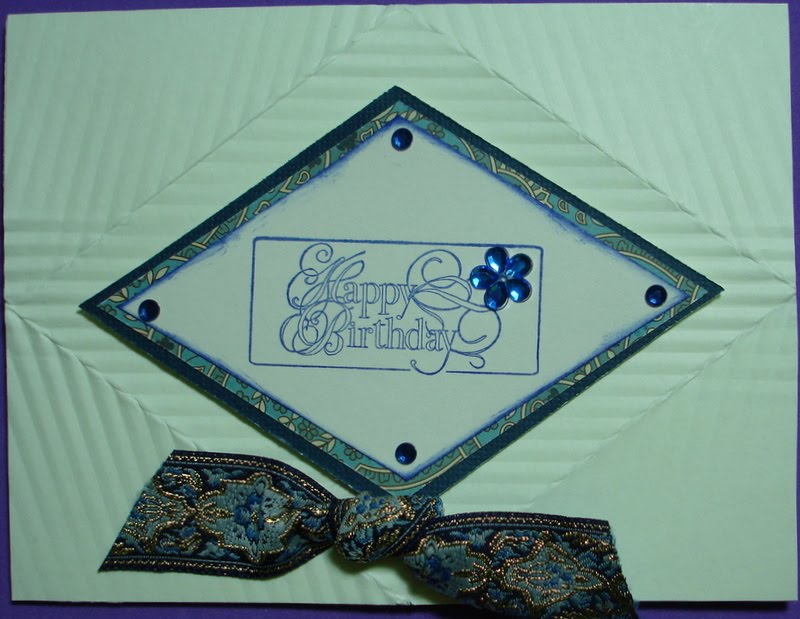
Crimped Diamond Card
I hope you all had a great weekend. Mine was busy. I didn't get a lot of crafting done though. However, I wanted to show you this card.

The background I did using a technique I learned on Splitcoast Stampers. This link should take you directly to the tutorial. There's a video at the bottom of the tutorial page, also. The paper crimper I used was a cheapie and did not crimp as well as I would like it to. I bought a better one yesterday at Michael's and used my 50% off coupon. It works much better. I like the effect of the crimping in this pattern. It's not simply plain. I cut diamonds from navy, floral and cream card stock and added some bling and ribbon to perk it up. There's no Cricut in this card but you could cut the diamonds in Cricut. It's a very simple card but sometimes simple is good.
Thank you for looking and I hope you will find some inspiration for a new project. God Bless you. Peggy
The background I did using a technique I learned on Splitcoast Stampers. This link should take you directly to the tutorial. There's a video at the bottom of the tutorial page, also. The paper crimper I used was a cheapie and did not crimp as well as I would like it to. I bought a better one yesterday at Michael's and used my 50% off coupon. It works much better. I like the effect of the crimping in this pattern. It's not simply plain. I cut diamonds from navy, floral and cream card stock and added some bling and ribbon to perk it up. There's no Cricut in this card but you could cut the diamonds in Cricut. It's a very simple card but sometimes simple is good.
Thank you for looking and I hope you will find some inspiration for a new project. God Bless you. Peggy
Wednesday, July 28, 2010
Christmas Tree Card
This is a Christmas tree I learned to make in a card class I took. It's really quite easy once you get the hang of folding the pieces. I was going to try to make a video but haven't quite got the hang of that yet. I'm one of those people who have a hard time talking or instructing off the top of my head. So I will probably have to practice before I actually "shoot" the end product. LOL
The first thing you need to do is cut squares of cardstock. You will need to use lightweight paper because this has several folds. I used my new Martha Stewart Scoring Board. I really like this product. It has numerous scorelines and comes with an envelope template and a scoring tool. I got it at Michael's with a 50% off coupon. With the coupon I only paid $9.99 for it. I have a Scor-it and it only has one scoreline and I paid a lot of money for it. Okay, enough commercial. (and I'm not even getting paid for this endorsement)
Cut 5 squares of cardstock beginning with 1 1/2 in. Then graduate the size by 1/2" each cut. You will have 1 1/2 ", 2", 2 1/2", 3", and 3 1/2". If you make a card larger than a 2A you can cut more pieces. Just remember to graduate them by 1/2".
Next score the squares diagonally.
Fold along all lines, score "hump" on the inside. After this fold the square in half.
After folding in half, push the sides of square to the inside of the fold. Your paper will then be a triangle, actually 2 triangles.
Take the top edges and fold to the inside. This is what it should look like.
Attach the tops of the pieces together with glue or double sided tape. Be sure to attach in the back triangle. Your tree will look like this. Add whatever embellishment you want.
This is the card I made using this technique. I would love to see what you come up with.
The first thing you need to do is cut squares of cardstock. You will need to use lightweight paper because this has several folds. I used my new Martha Stewart Scoring Board. I really like this product. It has numerous scorelines and comes with an envelope template and a scoring tool. I got it at Michael's with a 50% off coupon. With the coupon I only paid $9.99 for it. I have a Scor-it and it only has one scoreline and I paid a lot of money for it. Okay, enough commercial. (and I'm not even getting paid for this endorsement)
Cut 5 squares of cardstock beginning with 1 1/2 in. Then graduate the size by 1/2" each cut. You will have 1 1/2 ", 2", 2 1/2", 3", and 3 1/2". If you make a card larger than a 2A you can cut more pieces. Just remember to graduate them by 1/2".
Next score the squares diagonally.
Then score the squares down the middle. You want all of your scoring done on the same side of the paper.
After folding in half, push the sides of square to the inside of the fold. Your paper will then be a triangle, actually 2 triangles.
Take the top edges and fold to the inside. This is what it should look like.
Attach the tops of the pieces together with glue or double sided tape. Be sure to attach in the back triangle. Your tree will look like this. Add whatever embellishment you want.
This is the card I made using this technique. I would love to see what you come up with.
Again thank you for visiting our blog. Please tell your friends about us. We love comments and suggestions how to improve. God Bless. Peggy
Wednesday, July 21, 2010
Papercraft Inspirations
I found a website in the UK (click on this link) that offers free papers that you can print each month. I printed several on cardstock last year but with my husband's illness, I forgot about them. Donna and I came across them today so we decided to make some card sets. Another neice is having a birthday so one of these sets is for her. We hope she likes them.
The papers have several different designs, buttons, borders, etc. We added 3D stickers, stickles and bling. We popped some of elements to give dimension. We had a blast making these and hope you will visit Papercraft Inspirations and see what they have to offer.
This is what our workspace looked like when we finished. We did not have enough room in my "Woman Cave" so we had to move to the dining room. Peggy and Donna
The papers have several different designs, buttons, borders, etc. We added 3D stickers, stickles and bling. We popped some of elements to give dimension. We had a blast making these and hope you will visit Papercraft Inspirations and see what they have to offer.
This is what our workspace looked like when we finished. We did not have enough room in my "Woman Cave" so we had to move to the dining room. Peggy and Donna
Subscribe to:
Posts (Atom)