Showing posts with label Plantin Schoolbook. Show all posts

Friday, October 17, 2014

For Our Little Fireman

I have a great nephew, Jacob (are you supposed to call them great nephews or grand nephews) who loves playing policeman and fireman.  My brother, who is his Papa, bought him a police uniform and Jacob wore it until it was too small.  Then he bought him a fireman's uniform.  I think Jacob still tries to get in the  police uniform.  Anyway, when I saw this little digi I knew it would be the perfect card for him.  I'm going to show you the card then tell you about the different pieces I used to make it.

The background is a scrap piece of paper I used under some leaves I was inking.  I looked at it in a whole new light with the little fireman on.  I think it looks like fire.
The digi is a Sherry Baldi image.  He's called the Fireman.  I colored him with Promarkers.  If you would like to know which colors, leave me a message and I will let you know.
The little dog I found in Cricut Design Space.  He's from the Create A Critter cartridge.  You can cut his individual layers but I flattened him, then print and cut him.  I love that feature of the Explore.  I can't seem to find time to play with it as much as I would like.

The Award is also found in Cricut Design Space from the Plantin Cartridge.  I opened it and created text on it, attached the text to the award, then the Explore wrote the message and cut the award.  I was quite pleased I figured out how to do that.  Love that part of it too.  This is the inside of the card.
I'm going to mail Jacob his card tomorrow.  I can't wait to hear what he has to say about it.

Thank you for stopping by today.  Please come back tomorrow for our Paper A La Mode Challenge at The Outlaws.  I'll be looking for you.  God Bless You!!!!  Peggy

Thursday, July 7, 2011

Another Monogram Note Card - Cricut Cartridges

Remember this Imagine note card from yesterday?

Well for those of you who do not have an Imagine, I thought I would create one using Cricut cartridges.  Here it is.  Not too much difference, is there?

Card Recipe:
A2 Card Base
Background Paper - SEI White Elegance
Damask Decor cartridge- Page 31 - Silhouette feature - base and shadow 
Calligraphy cartridge for the frame for the monogram - Page 78 - Inspiration and Inspiration Blackout
Plantin Schoolbook cartridge for the letter - base and shadow.
Double ruffle ribbon - from Hobby Lobby
Pearls - from Michaels 

I put the different elements together with foam adhesives to give it dimension.  It's a simple but elegant card.  I have to admit, the one with the Imagine was much easier.  These would make a nice set of note cards for someone special. 

Thank you for your visit today.  We hope to see you again tomorrow.  God Bless You!!! Peggy

Friday, June 17, 2011

HAPPY FATHER'S DAY, CRAIG!!!

Hi Everyone!  I haven't posted in a while!  This month is one the busiest months at my job so I've been swamped with work both night and day! 

I figured that I better make a Father's Day card for my husband since Father's Day is this Sunday.  I must confess that I wasn't in the mood to make this type card because I've been really missing my Daddy!  He's been gone a little over a year now and I have many wonderful memories of what a great dad he was!!  It helps to know that I will see him again one day!!
I designed this card in Design Studio using Plantin and Mickey Font.  I welded the rectangle and the letters to form the card base.  I then cut the top of the card out of the blue paper in the DCWV Bluejean Paper.  I then cut the letters out of red and silver paper.  I used the Martha Stewart Heart Punch to punch the heart border down the side.  I pop dotted the red "Dad" on the front of the card and adhered the silver "Dad" to the inside.  I then used Word for the sentiment and then framed it with silver and red paper.

Don't forget to honor your Dad on Father's Day and make sure you tell him how special he is to you and treasure every moment.  Thanks for stopping by and we hope you'll come back again another day!  Until another day, God Bless You!!  Donna

Thursday, May 26, 2011

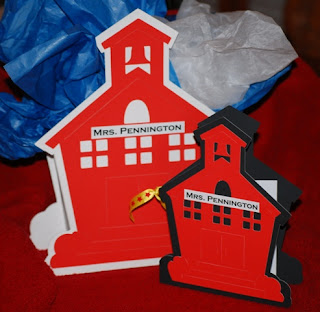
SCHOOLHOUSE BOX - My World and Plantin

Hi Everyone!  Today is the next to the last day of school.  I made Ms. Pennington one last gift to finish off the year.  I can honestly say that I feel that under Mrs. Pennington's instruction Jacob is more prepared for the 5th Grade than he would have been under any one else.  She has prepared all of her students to work hard and made the jobs of the teachers that have her students in their class next year a lot easier.

I decided to design a box using the schoolhouse on the My World cartridge.  In Design Studio, I cut out two of  the schoolhouses and two shadows of the schoolhouse.  I then used the rectangle on Plantin (only because it was already in my Jukebox) to cut out the inside of the box.  I cut two of the rectangles measuring 5" x 12" and used my ScorPal to score each side at 1".  I folded up the sides and attached them with Tacky Tape to the front and back of the box.


I then welded two shadow schoolhouses together in Design Studio to form the card base.  I then cut a red schoolhouse out for the front of the card.  I cut a square of white cardstock for the inside of the card to write on.

I used Word to print off Mrs. Pennington's name for the front of the school.  All in all, I think it turned out really cute.

Thanks for visiting us today and we hope you'll come back tomorrow.  We enjoy your visits and your comments.  Until another day, God Bless You!!  Donna

Monday, April 4, 2011

4th Grade Classroom Door - Spring

Hi Everyone - Using Design Studio and my Expression, I cut the decorations for Jacob's teacher's door for Spring.  You know that the schools are not allowed to mention anything about God so I wanted to come up with a saying that might possibly bring the Easter Holiday to mind!  To come up with the saying, I first thought about the Easter Holiday and the Resurrection of Christ and then I thought about how the flowers start blooming, the trees start budding, and all the animals are coming out from a long winter's nap!! I decided to use the saying,

"Spring brings new life to the world!"

Door Recipe:

Spring - Stretch Your Imagination
Other Words - welded using Design Studio and Cursive 101
Archway, Picket Fence, Flowers - Bloom
Border - Plantin, WIMG
Squirrels - can't remember

I think it turned out pretty!  Thanks for coming by and visiting - we hope you'll come back tomorrow!  If you see something you like, please let us know.  Until another day, God Bless You!  Donna

Thursday, January 13, 2011

Ewe Made My Day - Thank Ewe So Much!! Designed2Delight Challenge


Hi Everyone!  I've wanted to make an easel card so I thought I would make one for the Designed2Delight Challenge using a free digi from their blog.  I printed the directions on how to make an easel card from the Splitcoast Stampers website.

I colored the digi with Promarkers.  I colored two sheep and pop dotted them together on the front of the card for dimension.
I cut the following using my Cricut Expression:

Fence - My Community Cartridge, page 39 at 2"
Sun - Doodlecharms, page 96 at 1 1/4" - I cut 2 and pop dotted them together for dimension
Grass - Plantin Schoolbook, page 69 - I used Design Studio to cut two layers of grass for the front and three layers of grass for the inside of the card.

I printed the sentiments off on cream cardstock and pop dotted them.  When the card is standing, the grass goes up around the feet of the sheep like he is really standing in a field. 

I hope this card provides you with some inspiration.  Thanks for visiting and please leave a comment if you see something that you like.  Until another day, God Bless You!!  Donna

Tuesday, December 28, 2010

Tag/Gift Card Holders from Toilet Tissue Rolls.

I hope everyone had a great Christmas and that the Lord is more real to you now than He was before.  Christmas is a wonderful time of the year.  I'm thankful for my family and friends and all our blogging buddies.  You all are great.

We saw this project on Enfys Cashmore's blog "Going Buggy".  Donna needed a quick gift card holder so she made these in a very short time.
They are made by running toilet paper rolls through your Cuttlebug to flatten them.  Once you have them flattened, cover them with patterned paper.  Hers were decorated for Christmas but you could use these for any occasion year round.  She punched a hole in one end and inserted a jump ring.  You can put as many as you want on the jump ring but she only used two.  Another way you could put some of these together is to bind them with a Bind-it-all or another binding machine.

Next she made two tags using Plantin cartridge and decorated them.  She tied a ribbon pull through the ends of them,attached the gift card to one of them and then inserted them inside the covered tissue rolls.  I love the way she decorated the outsides of them.  She added ribbon to the jump ring.

You're probably wondering why I'm writing this post.  She is putting Jacob to bed.  We have had fun this week.  I don't know if I'll be able to get out of bed in the morning though.  Jacob and I have been playing Star Wars.  Isn't that a picture to torture your mind?  LOL!
What we don't do for our grandchildren.

Thank you  for your continued support.  We're so glad you're here.  By the way, this is not the "big" project she mentioned yesterday.  We're still working on it.  God Bless You!!!!  Peggy

Wednesday, November 3, 2010

4th Grade Classroom Door - Thanksgiving


Hi Everyone - I put up the November door decoration for Jacob's classroom yesterday . His teacher loved it. The theme this month was Thanksgiving of course!! I used a LOT of Cricut cartridges on this door but I think it turned out pretty good.

Words - Plantin
Leaves and Trees - Stretch Your Imagination
Wheelbarrow - Walk In My Garden
Pumpkins - Paper Dolls and Create A Critter
Fence - Paper Dolls
Border - Plantin and Stretch Your Imagination
Grass - Plantin

An update on the Door Decoration Contest from last month - well, I'm sorry to say that my door didn't win. But it only lost by one vote so that's pretty good!! Maybe next time!!

Thanks for visiting!! If you're a follower, please make sure that you're entered in the contest for the blog candy. We so appreciate everyone that visits with us each day. Until another day, God Bless!! Donna

Update on Christopher and Stephanie

We heard from a radio station reporting on the conditions, everyone at the resort are okay.  They have water, food and electricity from a generator.  It was beautiful there today and everyone was lying on the beach waiting until they can get to the airport.  Hopefully they will get home this weekend.  Thanks for your prayers.  Peggy 

Sunday, October 10, 2010

For You - Nana Vic's Digitals/Cricut


Do you remember that I told you that my mom was teaching me to color my digi stamps? Well, I downloaded the digi stamp on this card from Nana Vic's Digitals for free. Nana Vic has lots a beautiful digi stamps that she created herself. I decided I would enter a Sketch Challenge over at Taylored Expressions using this digi.

I used Design Studio to cut the scalloped green background paper. I used the square on Plantin and the Scalloped Rectangle on Lacey Labels and welded them together so that only one edge of the rectangle was scalloped. I colored the digi stamp using Marvy Markers (wish they were Promarkers but have to use what I have). I think my coloring has improved since Mom came to visit. She's a great teacher and Mom!!


Thank you for stopping by for a visit and we hope you'll come back soon!! Until another day, God Bless You! Donna


Friday, October 1, 2010

October 4th Grade Classroom Door

Hi Everyone!!  Well, I told you before that I would be decorating my son's teacher's door each month.  Well, his school is having a contest this month.  The doors had to be decorated in a football theme and the winning classroom will get an ice cream party.  I sure hope they win!!  The entry in the contest is below:

I used the following cartridges on this door:

Plantin Schoolbook - Words
Sports Mania - everything else

I must say his teacher was thrilled with the results.  We're keeping our fingers crossed that their classroom will win.  Thank you for coming to visit - we love visitors!!  Until another day, God Bless!  Donna

Wednesday, September 15, 2010

Straight From The Nest Card

I redeemed some of my rewards points for Straight From The Nest.  It has some nice designs and features that I want to try. 

The background paper for this card is from DCWV Garden Party Paper Stack.  This is a 5X7 card.  The fence is cut at 3 inches.  It is on page 74 of the SFTN handbook.  I would have cut it a little taller except I wanted the leaves and the flowers to show.  The "Butterfly Kisses is cut at 1".  It is on page 33 of the same handbook.  I added stickles to the letters so the phrase since the rest of the card had glitter.

The words on the inside were cut at 1" and I used Plantin Schoolbook for them.  For the message area, I cut a turquoise shadow at 6 1/2 X 4 1/2.  I then cut the top layer from the same paper as is on the front. 

We appreciate all of our followers and hope we can inspire someone to reach beyond themselves and create something beautiful.  You can do it.  You're all so talented.  God Bless You.  Peggy

Monday, September 6, 2010

4th Grade Classroom Door

Hey Everyone - I hope you all are having a wonderful Labor Day. I spent the weekend with my mom celebrating her birthday which is TODAY!!! So everyone wish Mom a Happy Birthday!!! Happy Birthday, Mom - I love you bunches!!!! I told her that everyone in the U.S. was getting the day off just to celebrate her birthday - HA!!!

Now on to our project for the day - Jacob's teacher asked for volunteers to decorate her door to the classroom each month this year. Well, you know I had to volunteer as that's right up my alley! She said she wanted a rocket/space theme to go along with what they are teaching in class right now. The picture below is what I came up with.

I used the following cartridges to create the images:

Just Because Cards - Rocket - cut at 24"
Zooballoo - cut out clouds and inked them to make them look like smoke balls coming out of
the rocket.
Plantin - Stars
Plantin - Scalloped Border with Stars - I used Design Studio to place a star inside the scallop
border and cut at 22"
Mickey Font - Words - cut at 3 3/4"

You'll be seeing a new door design each month this year. Next month's theme is going to be a football/teamwork theme. I've already got an idea for what I'll do for that - gotta stay ahead of the ballgame you know. Well, thank you for stopping by and we hope you'll come again soon!! Until another day, God Bless!! Donna

Saturday, July 10, 2010

Paper Pleating

Thursday I posted a masculine birthday card I sent my son.  This is actually the first card I made with him in mind.  I think it could be used for men as well as women.  Probably the color combination would determine which.


The scalloped edge was cut from Plantin Schoolbook.  The paper is some I picked up on a bargain rack.  I pleated a strip of paper to add a little dimension.  Pleating does better if you use a score board.  Then I cut the labels from Storybook.  I'm not sure who ended up with this card..

Speaking of labels.  Have you seen the Lite Cartridge Lacy Labels?  I have got to make a card with it.  I think it's one I'll use a lot.

Thanks for stopping by our blog.  I hope you have a great weekend.
Peggy 
Cricut Top 40