It seemed there was a rash of deaths last month involving people I knew. One of my best friends, who I worked with in NC, mother passed away recently. I wanted to make a special card for my friend. I had just gotten my Anna Griffin interchangeable Cuttlebug Folders from HSN so I decided to use one of them.
Isn't the embossing of this folder beautiful? The flowers I made from the Cricut Mother's Day Bouquet Cartidge. The butterfly is from the Cricut Indie Art Cartridge. I added Wink of Stella to the message to give it some shine. I think the pink jewels add flare too.
Thanks for visiting today. We love our followers and would love to hear from you. God Bless You!!!! Peggy
Challenges for this card:
613 Avenue Create - W - #118 A True Anything Goes/NO TWIST
Dragonfly Dreams - M – Add Some Embellishments
Glitter n Sparkle - W - #131 Anything Goes
Lil Patch of Crafty Friends - 2W (1st and 3rd Sunday) E3, C10 #7 Anything Goes
Robyn`s Fetish - W - #258 Pastel Colors
Showing posts with label Indie Art. Show all posts
Monday, April 6, 2015
Tuesday, October 21, 2014
Through The Craft Room Door Challenge - Star FoldCard
Today is the beginning of another challenge at Through The Craft Room Door. The theme is always Anything Goes. I hope you will join us this week. The Design Team has some beautiful inspiration. This is my card for this week.
I found this card on a blog called Pysseltagen. There is a tutorial there on the star fold card but I found a problem with one of the instructions for the the card in inches instead of centimeters. So I decided to write it up as clearly as I can. This design is not original to me. The designer is Mary, also known as Bela Mio. This is my finished card.
First step is to take a 12X12 piece of cardstock. Mark the center on one side (6") on the edge and then about 2 inches down. Draw a line between them. Then measure from each corner to the line drawn where the end of the ruler touches the line. If this is done correctly you will have a triangle with all sides measuring 12 ".
Cut out triangle. Measure to center point (6") on all sides of the triangle. Then draw a line connecting the points. You now have your center triangle.
Next measure 2" from the points of the interior triangle on all sides.
Score on the center triangle lines and the 2" marks.
Fold the score lines of the traingle in toward the card and the 2" lines out.
Tuck the ends of the cards into each other. Now you have a star fold card ready to decorate.
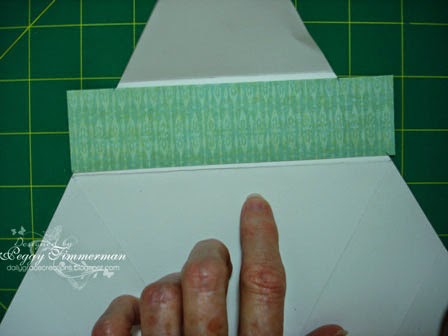
Measure the edges of your inside triangle to determine what size your strips of decorative paper need to be. You will want to cut them a little smaller so they will fit and have a border around them. I chose 2 designs from the KandCo. Classic K. Bailey Stack.
You will need 6 strips of paper measuring in the neighborhood of 5 3/4" X 1 3/4". Make sure before you cut them. Lay each one on the 2 " strips to find the points at which they need to be cut to fit the panels.
Cut between the marks to form an angle.
Place 3 of the strips on the outside of the card and 3 on the inside of the card.
On a coordinating piece of designer paper, trace the end triangles. Cut inside of the lines to assure fit and a little border around the piece of paper.
Adhere to the triangle corners that will fold out on your card.
Trace the inside triangle on designer paper. I used two different patterns and jaggedly tore them and pasted together. This is the center of your card. I inked around all my paper cuts with a $1.00 green ink I bought at Michaels.
This is your card before any more embellishments. Now you are ready to decorate to your heart's content. I will show you what I did but you can do anything you like.
This butterfly is a cut from the Indie Art cartridge cut at 1". When I finished the card, I folded it, and place Liquid Pearls on two of the triangle ends to indicate the flight of the butterfly.
This is the center of my card. The sentiment label is an Imagine image. I used a coordinating paper and white cardstock, inked the edges and decorated with left over flower cuts. The sentiment is a wooden stamp I bought at Hobby Lobby.
Again, this is the finished product. I hope this makes sense and you will give this a try. Thanks for dropping in today. We appreciate your visits and comments. God Bless You!!! Peggy
I found this card on a blog called Pysseltagen. There is a tutorial there on the star fold card but I found a problem with one of the instructions for the the card in inches instead of centimeters. So I decided to write it up as clearly as I can. This design is not original to me. The designer is Mary, also known as Bela Mio. This is my finished card.
Cut out triangle. Measure to center point (6") on all sides of the triangle. Then draw a line connecting the points. You now have your center triangle.
This is your card before any more embellishments. Now you are ready to decorate to your heart's content. I will show you what I did but you can do anything you like.
I had some trim that I placed around the edges of the corner triangles. On one of the corners, I folded a small doily twice, inked the edges with the same green ink I used on the paper cuts. Added a large jewel and pearls.
I used Mother's Day Bouquet to cut out these flowers. I used 3 different types of flowers and staggered them. I cut them at 1", .9, and .8. This butterfly is a cut from the Indie Art cartridge cut at 1". When I finished the card, I folded it, and place Liquid Pearls on two of the triangle ends to indicate the flight of the butterfly.
This is the center of my card. The sentiment label is an Imagine image. I used a coordinating paper and white cardstock, inked the edges and decorated with left over flower cuts. The sentiment is a wooden stamp I bought at Hobby Lobby.
Again, this is the finished product. I hope this makes sense and you will give this a try. Thanks for dropping in today. We appreciate your visits and comments. God Bless You!!! Peggy
Tuesday, May 13, 2014
Butterfly Inspiration
I was looking on Pinterest today at a board called cards. It belonged to someone who repinned one of my pins. I was inspired by a side step card I saw there. I tell you when I see other people's creations, I am in awe. I was thinking of trying to make one similar. But when I got to looking through my paper for some to use, I came across a partial sheet from a paper pack by DCWV called Ciao Bella. I decided to make a card from it.
Card Supplies:
5.5X7.5 card base - I made it this big in order to use most of this design.
Background paper - DCWV Ciao Bella Paper Stack
Large Butterflies - Indie Art Cricut Cartrdige - cut from same sheet of paper as the background. I also used my Explore to cut them.
Small Butterflies - Cut with a Martha Stewart punch
Ribbon
Gems - for back of butterflies
I really pleased with this card. I hope you like it. Thank you for coming by today. We love your comments and look forward to hearing from you. God Bless You!!!! Peggy
Challenges for this card:
Craft-Dee BowZ - M, E3, project must have bow - (May) Anything Goes with a Handmade Bow
Crafting from the Heart - W, E3 - Always Anything Goes
Scrapbook Stamp Society Challenge Blog - 2W, 3E - (Week 1) Anything goes + Option: Spring
Card Supplies:
5.5X7.5 card base - I made it this big in order to use most of this design.
Background paper - DCWV Ciao Bella Paper Stack
Large Butterflies - Indie Art Cricut Cartrdige - cut from same sheet of paper as the background. I also used my Explore to cut them.
Small Butterflies - Cut with a Martha Stewart punch
Ribbon
Gems - for back of butterflies
I really pleased with this card. I hope you like it. Thank you for coming by today. We love your comments and look forward to hearing from you. God Bless You!!!! Peggy
Challenges for this card:
Craft-Dee BowZ - M, E3, project must have bow - (May) Anything Goes with a Handmade Bow
Crafting from the Heart - W, E3 - Always Anything Goes
Scrapbook Stamp Society Challenge Blog - 2W, 3E - (Week 1) Anything goes + Option: Spring
Monday, February 17, 2014
Three Ways To Make The Same Card
A while back I posted a card inspired by Enfys Cashmore of Going Buggy. At the time of her post, she was giving away some votive covers to two people who left a comment on her blog. I'm pleased to say I was one of those winners. I'll show them to you a little later in this post. First I want to show you the card I made using one of them. Notice the embossing on the paper. It is American Crafts Specialty Paper - Damask.
This is a picture of some of the votive covers.
I used Martha Stewart punches for the butterflies and bent their wings. I added Stickles - Waterfall down the spines of them.
After making it, I thought it would be to make one with the Cricut & the Silhouette Cameo because the votive covers are from the UK and I couldn't find any in the US.
First I used the Cricut Expression 2 to make this card.
Products I used:
Anna Griffin "Rosa" Cuttlebug Embossing Folder for the embossing on the cardstock.
Paper Trimmings Cricut Cartridge for the Butterfly Border.
Indie Art Cricut Cartridge for the Butterflies. This is my favorite butterfly image. I cut the basic & the blackout in various sizes.
This card was made with the Silhouette Cameo.
Products I used to make it:
SEI White Elegance Paper
Snapdragon Snippets Butterfly Flourish Border - Design # 43300
Silhouette Butterfly - Design #2004 cut at varying sized.
These cards were not hard to make but yet have simple elegance about them. Thank you for letting me share them with you.
I hope you will come back soon. God Bless You!!!! Peggy
Challenges for these cards:
Scrappy Hands Embossing
Stamping Sensations Wings, Fantasy and Fiction.
Crafting Musketeers - Butterflies
Feeling Crafty Challenge - Dies and/or Punches
Just B Creative Crazy - Feb Linky Party Anything goes
One Crazy Stamper - Anything Goes
The Crafting Cafe - Embossing
I used Martha Stewart punches for the butterflies and bent their wings. I added Stickles - Waterfall down the spines of them.
After making it, I thought it would be to make one with the Cricut & the Silhouette Cameo because the votive covers are from the UK and I couldn't find any in the US.
First I used the Cricut Expression 2 to make this card.
Products I used:
Anna Griffin "Rosa" Cuttlebug Embossing Folder for the embossing on the cardstock.
Paper Trimmings Cricut Cartridge for the Butterfly Border.
Indie Art Cricut Cartridge for the Butterflies. This is my favorite butterfly image. I cut the basic & the blackout in various sizes.
This card was made with the Silhouette Cameo.
Products I used to make it:
SEI White Elegance Paper
Snapdragon Snippets Butterfly Flourish Border - Design # 43300
Silhouette Butterfly - Design #2004 cut at varying sized.
These cards were not hard to make but yet have simple elegance about them. Thank you for letting me share them with you.
I hope you will come back soon. God Bless You!!!! Peggy
Challenges for these cards:
Scrappy Hands Embossing
Stamping Sensations Wings, Fantasy and Fiction.
Crafting Musketeers - Butterflies
Feeling Crafty Challenge - Dies and/or Punches
Just B Creative Crazy - Feb Linky Party Anything goes
One Crazy Stamper - Anything Goes
The Crafting Cafe - Embossing
Monday, March 11, 2013
Totally White-Totally Cricut Card
I have had a totally white card rolling around in my head for a while. So today I decided to give it a go. I ended up using all Cricut products to make it, except for the pearls. It was nice making all the cuts out of one sheet of paper. I must say I'm pleased with how it turned out.
Card Recipe:
5X6.5" Card Base
"Scalloped Edge" Cuttlebug Folder for the embossing
Flowers - Mother's Day Bouquet cartridge - Cut in 1/4" increments.
Leaves - From the Creative Cards cartridge
Butterfly - From the Indie Art cartridge
Pearls
This is the inside of the card. As you can see, I continued the same all white theme for decorating the inside.
Donna came over yesterday afternoon and we added a new little work space to my craft room. I was thinking of getting a table but she suggested I get some of storage units from Michael's. Good idea, Donna. I already had two of them under my desk for paper storage so we just moved those out and added 2 more for another pedestal. Donna had one of the shelves she wasn't using so we laid it across the top. I must say I love it. My computer is sitting on it now but I have a Silhouette Cameo on order and that will be it's home when it gets here. I can't wait.
Card Recipe:
5X6.5" Card Base
"Scalloped Edge" Cuttlebug Folder for the embossing
Flowers - Mother's Day Bouquet cartridge - Cut in 1/4" increments.
Leaves - From the Creative Cards cartridge
Butterfly - From the Indie Art cartridge
Pearls
This is the inside of the card. As you can see, I continued the same all white theme for decorating the inside.
Donna came over yesterday afternoon and we added a new little work space to my craft room. I was thinking of getting a table but she suggested I get some of storage units from Michael's. Good idea, Donna. I already had two of them under my desk for paper storage so we just moved those out and added 2 more for another pedestal. Donna had one of the shelves she wasn't using so we laid it across the top. I must say I love it. My computer is sitting on it now but I have a Silhouette Cameo on order and that will be it's home when it gets here. I can't wait.
Thank you for stopping in today. I hope you enjoyed out little piece of the blogoshere and that you will come again. God Bless You!!!! Peggy
Tuesday, October 4, 2011
Just Because Gift for Teachers - Indie Art
Hi Everyone - I thought I would send a little "appreciation" gift to Jacob's teachers. Jacob is really enjoying school this year. His favorite subject is Science. I must say that the things he's learning in 5th grade, I don't know if I "ever" learned them!! Last week, his bonus spelling word was "quantitative observation" which was one of his science vocab words. Even though we didn't study how to spell that, he got it correct and made 102 on his test - WOW!!!!
I know I'm rambling (and bragging on my son a little) but I said all that to say that teachers have a hard job and I try to let Jacob's teachers know that we appreciate them. I visited my home away from home - Michael's - and found some pretty little notepads. I can never have too many notepads around so I bought enough for all three teachers and decided to decorate the gift bags with crowns to match the pads.
- I used the Indie Art cartridge to cut the shadow crown out of black cardstock measuring 3".
- I then cut the top of the crown out of "red glitter paper" at 3".
- I had to set the Expression to cut the top twice each time because the paper was so thick even with the deep cut blade.
- I then popped the top of the crown on the shadow with black pop dots and adhered the crowns to the bags.
- I cut 2" shadow crowns for gift tags and tied them to the bags with ribbon. I wrote the teachers names on the tags with a Metallic Grey Sharpie.
Wednesday, September 7, 2011
Star Fold Card
I found this card on a blog called Pysseltagen. There is a tutorial on the star fold card but I found a problem with one of the instructions for the the card in inches instead of centimeters. So I decided to write it up as clearly as I can. This is the finished card.
First step is to take a 12X12 piece of cardstock. Mark the center on one side (6") on the edge and then about 2 inches down. Draw a line between them. Then measure from each corner to the line drawn where the end of the ruler touches the line. If this is done correctly you will have a triangle with all sides measuring 12 ".
Cut out triangle. Measure to center point (6") on all sides of the triangle. Then draw a line connecting the points. You now have your center triangle.
Next measure 2" from the points of the interior triangle on all sides.
Score on the center triangle lines and the 2" marks.
Fold the score lines of the traingle in toward the card and the 2" lines out.
Tuck the ends of the cards into each other. Now you have a star fold card ready to decorate.
Measure the edges of your inside triangle to determine what size your strips of decorative paper need to be. You will want to cut them a little smaller so they will fit and have a border around them. I chose 2 designs from the KandCo. Classic K. Bailey Stack.
You will need 6 strips of paper measuring in the neighborhood of 5 3/4" X 1 3/4". Make sure before you cut them. Lay each one on the 2 " strips to find the points at which they need to be cut to fit the panels.
Cut between the marks to form an angle.
Place 3 of the strips on the outside of the card and 3 on the inside of the card.
On a coordinating piece of designer paper, trace the end triangles. Cut inside of the lines to assure fit and a little border around the piece of paper.
Adhere to the triangle corners that will fold out on your card.
Trace the inside triangle on designer paper. I used two different patterns and jaggedly tore them and pasted together. This is the center of your card. I inked around all my paper cuts with a $1.00 green ink I bought at Michaels.
This is your card before any more embellishments. Now you are ready to decorate to your heart's content. I will show you what I did but you can do anything you like.
I had some trim that I placed around the edges of the corner triangles. On one of the corners, I folded a small doily twice, inked the edges with the same green ink I used on the paper cuts. Added a large jewel and pearls.
I used Mother's Day Bouquet to cut out these flowers. I used 3 different types of flowers and staggered them. I cut them at 1", .9, and .8.
This butterfly is a cut from the Indie Art cartridge cut at 1". When I finished the card, I folded it, and place Liquid Pearls on two of the triangle ends to indicate the flight of the butterfly.
This is the center of my card. The sentiment label is an Imagine image. I used a coordinating paper and white cardstock, inked the edges and decorated with left over flower cuts. The sentiment is a wooden stamp I bought at Hobby Lobby.
Again, this is the finished product. I hope this makes sense and you will give this a try. Thanks for dropping in today. We appreciate your visits and comments. God Bless You!!! Peggy
First step is to take a 12X12 piece of cardstock. Mark the center on one side (6") on the edge and then about 2 inches down. Draw a line between them. Then measure from each corner to the line drawn where the end of the ruler touches the line. If this is done correctly you will have a triangle with all sides measuring 12 ".
Cut out triangle. Measure to center point (6") on all sides of the triangle. Then draw a line connecting the points. You now have your center triangle.
Next measure 2" from the points of the interior triangle on all sides.
Score on the center triangle lines and the 2" marks.
Tuck the ends of the cards into each other. Now you have a star fold card ready to decorate.
Measure the edges of your inside triangle to determine what size your strips of decorative paper need to be. You will want to cut them a little smaller so they will fit and have a border around them. I chose 2 designs from the KandCo. Classic K. Bailey Stack.
You will need 6 strips of paper measuring in the neighborhood of 5 3/4" X 1 3/4". Make sure before you cut them. Lay each one on the 2 " strips to find the points at which they need to be cut to fit the panels.
Cut between the marks to form an angle.
Place 3 of the strips on the outside of the card and 3 on the inside of the card.
On a coordinating piece of designer paper, trace the end triangles. Cut inside of the lines to assure fit and a little border around the piece of paper.
This is your card before any more embellishments. Now you are ready to decorate to your heart's content. I will show you what I did but you can do anything you like.
I used Mother's Day Bouquet to cut out these flowers. I used 3 different types of flowers and staggered them. I cut them at 1", .9, and .8.
Again, this is the finished product. I hope this makes sense and you will give this a try. Thanks for dropping in today. We appreciate your visits and comments. God Bless You!!! Peggy
Friday, August 5, 2011
ORNAMENTAL IRON & INDIE ART
Hi Everyone! Happy Friday to you all! I think Mom and I are on the same wave length this week. She made a butterfly card the other day and I had been thinking about a card that I wanted to make and it also included a butterfly. Well, I made it anyway because I love butterflies. They represent the beginning of new life to me. So here's my card made with Ornamental Iron and Indie Art.
Card Recipe:
Paper - Anna Griffin Georgette Collection
Used Design Studio (because I can't get CCR to cut) to merge a rectangle from George and two "window shadows" to form the gate fold card base at 6" by 12"
I cut the gates from Ornamental Iron and applied to the front of card.
Butterfly - cut from Indie Art at 3" - used the swirl Cuttlebug folder on the shadow cut of the butterfly.
Pearls were purchased at Michael's
Sentiment on the inside of the card reads - "Just Fluttering by to say HI"
Thanks for stopping by! We wish you a Happy Weekend! I don't know how happy mine will be - this is tax free weekend in TN and we are going to go "school clothes" shopping for Jacob. Let me just say - he's NOT a shopper so this should be fun - NOT!!! Please pray for me and for him that we'll both survive!!
Until another day, God Bless You! Donna
Card Recipe:
Paper - Anna Griffin Georgette Collection
Used Design Studio (because I can't get CCR to cut) to merge a rectangle from George and two "window shadows" to form the gate fold card base at 6" by 12"
I cut the gates from Ornamental Iron and applied to the front of card.
Butterfly - cut from Indie Art at 3" - used the swirl Cuttlebug folder on the shadow cut of the butterfly.
Pearls were purchased at Michael's
Sentiment on the inside of the card reads - "Just Fluttering by to say HI"
Thanks for stopping by! We wish you a Happy Weekend! I don't know how happy mine will be - this is tax free weekend in TN and we are going to go "school clothes" shopping for Jacob. Let me just say - he's NOT a shopper so this should be fun - NOT!!! Please pray for me and for him that we'll both survive!!
Until another day, God Bless You! Donna
Sunday, February 27, 2011
Butterfly & Thistle - Theodore & Tulip
Sundays are going to be new release days on Heart Song Designs so I will be posting Leah's new images on Sundays while I'm on her Design Team. Today's images are Butterfly and Thistle and Theodore & Tulip. I played with them and these are the cards I came up with.
Butterfly & Thistle card recipe:
A2 card base
Background paper - DCWV Ciao Bella
Yellow paper framing image and from which butterflies were made is DCWV Textures & Finishes
Butterflies cut from Indie Art Cartridge at 1.5 and 1.25
Crystal Bling for Butterflies
Promarkers Used:
Thistle - Pink Carnation, Fuschia
Greenery - Tea Green, Grey Green
Butterfly - Buttercup, Ivory, Umber
Theodore and Tulip card Recipe
A2 card base
Background Paper - Plaid is DCWV Nana's Kitchen - Floral is DCWV Glitter Stack - Solid is The Paper Studio's So So Sweet
Cuttlebug to emboss the solid paper behind Theodore.
Martha Stewart Pansy Punch Around the Page Punches
Promarkers Used
Theordore - Cool Gray 1, Pale Pink
Tulip - Lipstick Red, Berry, Bright Green, Forest Green
These are Leah's images:
Be sure to go over to Heart Song Designs Store and also the Inspiration Blog. Check out what the DT has been up to. Thank you for stopping by today. I hope this is the best Sunday of your life. God Bless You!!!Peggy
Butterfly & Thistle card recipe:
A2 card base
Background paper - DCWV Ciao Bella
Yellow paper framing image and from which butterflies were made is DCWV Textures & Finishes
Butterflies cut from Indie Art Cartridge at 1.5 and 1.25
Crystal Bling for Butterflies
Promarkers Used:
Thistle - Pink Carnation, Fuschia
Greenery - Tea Green, Grey Green
Butterfly - Buttercup, Ivory, Umber
Theodore and Tulip card Recipe
A2 card base
Background Paper - Plaid is DCWV Nana's Kitchen - Floral is DCWV Glitter Stack - Solid is The Paper Studio's So So Sweet
Cuttlebug to emboss the solid paper behind Theodore.
Martha Stewart Pansy Punch Around the Page Punches
Promarkers Used
Theordore - Cool Gray 1, Pale Pink
Tulip - Lipstick Red, Berry, Bright Green, Forest Green
These are Leah's images:
Be sure to go over to Heart Song Designs Store and also the Inspiration Blog. Check out what the DT has been up to. Thank you for stopping by today. I hope this is the best Sunday of your life. God Bless You!!!Peggy
Subscribe to:
Posts (Atom)