Today is the beginning of another challenge at Through The Craft Room Door. The theme is always Anything Goes. I hope you will join us this week. The Design Team has some beautiful inspiration. This is my card for this week.
I found this card on a blog called Pysseltagen. There is a tutorial there on the star fold card but I found a problem with one of the instructions for the the card in inches instead of centimeters. So I decided to write it up as clearly as I can. This design is not original to me. The designer is Mary, also known as Bela Mio. This is my finished card.
First step is to take a 12X12 piece of cardstock. Mark the center on one side (6") on the edge and then about 2 inches down. Draw a line between them. Then measure from each corner to the line drawn where the end of the ruler touches the line. If this is done correctly you will have a triangle with all sides measuring 12 ".
Cut out triangle. Measure to center point (6") on all sides of the triangle. Then draw a line connecting the points. You now have your center triangle.
Next measure 2" from the points of the interior triangle on all sides.
Score on the center triangle lines and the 2" marks.
Fold the score lines of the traingle in toward the card and the 2" lines out.
Tuck the ends of the cards into each other. Now you have a star fold card ready to decorate.
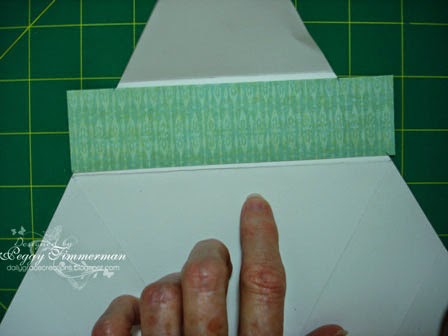
Measure the edges of your inside triangle to determine what size your strips of decorative paper need to be. You will want to cut them a little smaller so they will fit and have a border around them. I chose 2 designs from the KandCo. Classic K. Bailey Stack.
You will need 6 strips of paper measuring in the neighborhood of 5 3/4" X 1 3/4". Make sure before you cut them. Lay each one on the 2 " strips to find the points at which they need to be cut to fit the panels.
Cut between the marks to form an angle.
Place 3 of the strips on the outside of the card and 3 on the inside of the card.
On a coordinating piece of designer paper, trace the end triangles. Cut inside of the lines to assure fit and a little border around the piece of paper.
Adhere to the triangle corners that will fold out on your card.
Trace the inside triangle on designer paper. I used two different patterns and jaggedly tore them and pasted together. This is the center of your card. I inked around all my paper cuts with a $1.00 green ink I bought at Michaels.
This is your card before any more embellishments. Now you are ready to decorate to your heart's content. I will show you what I did but you can do anything you like.
I had some trim that I placed around the edges of the corner triangles. On one of the corners, I folded a small doily twice, inked the edges with the same green ink I used on the paper cuts. Added a large jewel and pearls.
I used Mother's Day Bouquet to cut out these flowers.
I used 3 different types of flowers and staggered them. I cut them at 1", .9, and .8.
This butterfly is a cut from the Indie Art cartridge cut at 1". When I finished the card, I folded it, and place Liquid Pearls on two of the triangle ends to indicate the flight of the butterfly.
This is the center of my card. The sentiment label is an Imagine image. I used a coordinating paper and white cardstock, inked the edges and decorated with left over flower cuts. The sentiment is a wooden stamp I bought at Hobby Lobby.
Again, this is the finished product. I hope this makes sense and you will give this a try. Thanks for dropping in today. We appreciate your visits and comments. God Bless You!!! Peggy


This is so gorgeous, Peggy!! Thank you so much for all the detailed instructions! I've bookmarked this page for reference!! The soft papers and colors are so perfect with each other!!
ReplyDeleteHugs
Darcy
I absolutely love this card! Thanks so much for the directions! (Hugs) Cara
ReplyDeleteGorgeous card Peggy. Thank you for the instructions I will have to try that for myself :D
ReplyDeleteGreat card! I'd duplicate this in the Silhouette Studio so I'd only have to do the measurements once. With the V3 you can set the score lines with a lower pressure and cut and score all at once. You probably know that though;-)
ReplyDeleteYou did a wonderful job on your star. I'm so glad you add a tutorial of how to make it. I will have to try to make this.
ReplyDeleteHugs, Pat