
Is there anyone out there that's addicted to Pinterest??? YES, I've got my hand raised, so don't feel ashamed. If I get on the site, I can't seem to get off! Mom will send me a Skype message sometimes telling me to get off Pinterest so I can make something to post on the blog. The idea/instructions for this post were taken off Pinterest! I've been wanting to make this project for a while but just didn't take the time to do it.
First - how many of you shop at the $1 Bins at Michael's? Well, it's a favorite place for Mom and me to spend (a lot of) money and believe me - those $1 items add up. These bins have LOTS of beautiful card packs for $1. I recently bought several sets and decided to use some of them on this project.
I went to Home Depot and bought 4" x 4" white tiles for 16 cents each. I had already bought Mod Podge at Michael's with a 40% off coupon and a spray can of Sealant at Hobby Lobby with another 40% off coupon. I already had felt furniture dots to use on the bottom of the tiles so they won't scratch the furniture.


I used two cards that I cut in half and then cut into 4" x 4" size.

I applied a thin coat of Mod Podge to the top of the tile and the 4" x 4" square. I placed it on top of the tile and used a bone folder to take across the top of the tile to press out any air bubbles that may be present.
Let that dry and then apply a thin coat on top of the cardbase on the tile.
Let that dry and repeat.
Once the tiles are dry, take them outside (because you're not supposed to use the sealant indoors) and spray the tiles with the sealant. Let dry, Repeat.
After you bring them back indoors, put felt furniture dots on the bottom of the tiles so they don't scratch the furniture.

While the tiles were drying, I decided to make a box for the coasters. I took a 12 x 12 piece of paper and scored it at 4 1/4" going both ways on the paper.


To strengthen the bottom of the box, I used an 8 1/2 x 11 piece of heavy cardstock, and cut 4 - 4 x 4 squares, glued them together, and then put them in the bottom of the box.

For the lid, I found a box on Silhouette Online Store and sized the top to 7" x 7" to fit my box bottom. I wanted a box that had an opening cut so that the tiles would show through.
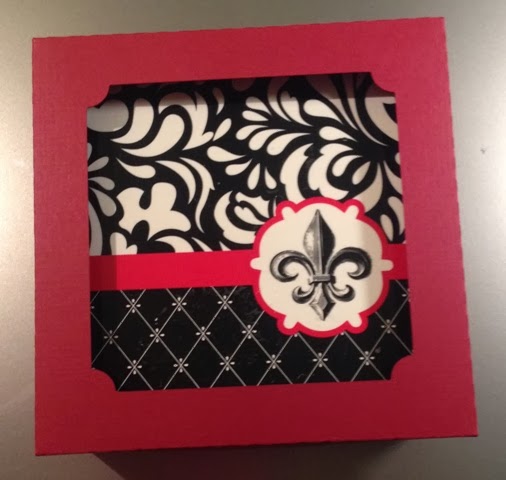
I found some red wired ribbon and tied a bow around the box. I cut a Valentine tag (Silhouette Online Store) and tied it around the ribbon around the package. I paired the coasters with a mouse pad to match the coasters - also bought from the $1 bins at Michael's. This is proof that you don't have to spend a lot of a money on a gift. You can make something that looks a lot more expensive for not a lot of money at all.

I gave Jean her gift today because we are expecting snow here this week and I didn't know if I would see her on Friday. SHE LOVED IT!!!!
I must say, the project was SO EASY!! I'm amazed at how easy it was and how GREAT they look! If you try this, please send us pictures of your coasters. Believe me, it's easy.
Thanks so much for stopping by - we appreciate your visits and your comments. Please come back tomorrow - I made another set of coasters for mom and my Aunt Nellie using different cards and they are REALLY pretty too. They loved them too!!! Until another day, God Bless You!! Donna
Challenges:
·
All Crafts
Challenge - 2M, 1st Monday of the month every other
month, NO CARDS - (February/March) Anything but a Card
·
Scrapbook Stamp
Society Challenge Blog - 2W, 3E - (Week 2) Anything goes + Option: Use a Heart on your Card

What a fab project I'm not surprised you friend loved it any one would. Thanks for playing at Crafting From The Heart. Tracy DT
ReplyDeleteThe coasters are beautiful, Donna! Thanks for the great directions - I have to find time to try this. TFS : ) Christine
ReplyDeleteStunning idea! What a great use of your cards and your box with bow is fabulous. Thanks for joining the Craft-Dee BowZ challenge this month!
ReplyDeleteA fab project a great idea. Thank you for joining us at Dream Valley Challenge. Marlene DT
ReplyDeleteWow. This is a fab project. I love the box you created to put them in as a gift. The tiles themselves look lovely and make a stunning present. I'm eyeing the old coaster on my desk up and down as we speak. Time I think to have a spot of TLC done to it. Thanks for the idea and Thank you for joining in at Craft My Life challenge. Hugs Mrs A. (DT.)
ReplyDeleteOh My, Outstanding, love the coasters and the box...great tutorial too, thank you for sharing, also, thank you for sharing with us at Crafting From the Heart, this week, best of luck xxxx
ReplyDeleteWhat a great project fantastic work thanks for sharing it with us at artistic inspirations.
ReplyDeleteGood luck
Fiona dt. x
Awesome gift! Truly love those tiles and the box you made for them!
ReplyDeleteThank you for joining our Color Challenge over at Love to Create Challenges this week.
Ruza, LTC Admin/Designer
Ruza's Craft Corner
fantastic project. Thanks for joining us at
ReplyDeleteThrough The Purple Haze Challenges Hope to see you again next week
Hugs, Teresa DT
Ceesa's Card Creations
Fabulous project! I'm a Pinner too and it can totally consume your time. ;) I'm glad you shared this box though because I love it. Thanks for joining us at Make It Monday. Hugs, Lisa DT
ReplyDeleteVery cute project. I love combo red & black is so classic. Thanks for playing with us at Dream Valley challenge.
ReplyDeleteNathalie DT
these are such a fabulous idea and make a fantastic gift! Thanks for joining us with our anything goes challenge at Through the Purple Haze Challenges this week and good luck! Anita DT
ReplyDeleteWhat a wonderful project. Thanks for the tutorial I have been thinking of doing these for a while. Now I think I will go and get it done. Good luck this week at Artistic Inspirations
ReplyDeleteCarmen
Co-owner AI
I Just love this project well done and thanks for joining us at TTPH
ReplyDeleteNicola DT